This is the multi-page printable view of this section. Click here to print.
Software
- 1: Flashing the SD Card
- 2: Connecting to the Jetson
- 3: Updating VMC Software
- 4: Running VMC Software
- 5: Connecting QGC
- 6: Flight Controller Parameters
- 7: GUI
1 - Flashing the SD Card
First, you need to download the Jetson’s operating system. A custom image with a baseline AVR software can be found here avr23.zip. This is a large file, so it will take a while.
After the .zip file finishes downloading, extract this file, and plug in your
microSD card.
Windows
To flash the SD card on Windows, we recommend a tool called Rufus.
Go to this page and download
the rufus-<version>.exe file.

Download this installer file
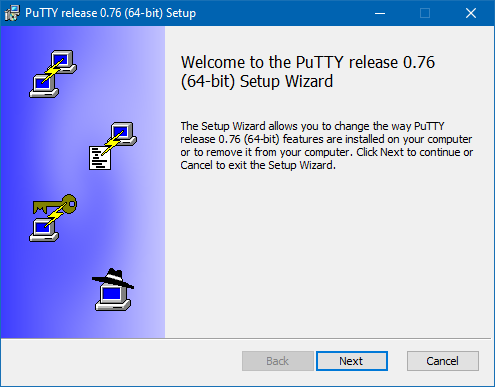
Go ahead and launch Rufus. When you launch the application, it should look something like this:

Rufus main window
- Make sure the correct device is selected. If your microSD card is not blank, it will probably have a different label.
- Select the
.imgfile in the folder you extracted.
You will now be able to click the “START” button in Rufus. Go ahead and click this. You will get a number of warnings that you’re about to format and wipe this microSD card.
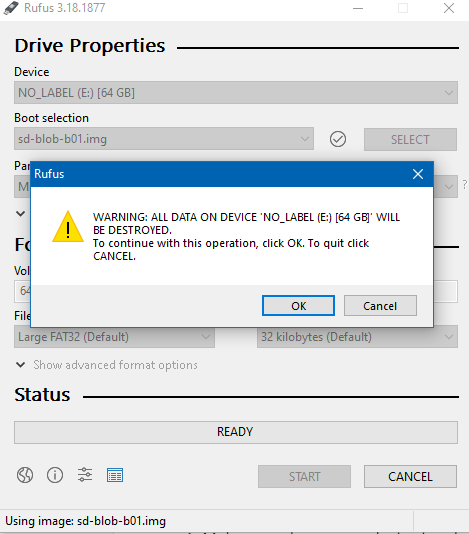
Rufus warnings
Go ahead and click through all of these, you know what you’re doing. Rufus will begin flashing the microSD card and at the end will let you know when it’s finished.
MacOS/Linux
To flash the SD card on MacOS or Linux, we recommend using Balena Etcher. Go to their website and follow the instructions to download and install Balena Etcher.
Go ahead and launch Balena Etcher.
Select the .img file in the folder you extracted, and select your microSD card.
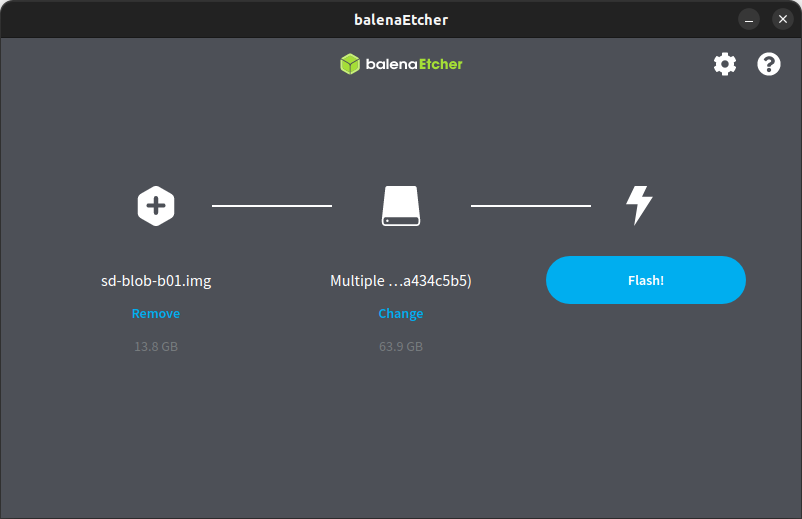
Options selected in Balena Etcher
Once you hit “Flash”, you may be prompted to enter your password for super user privileges.
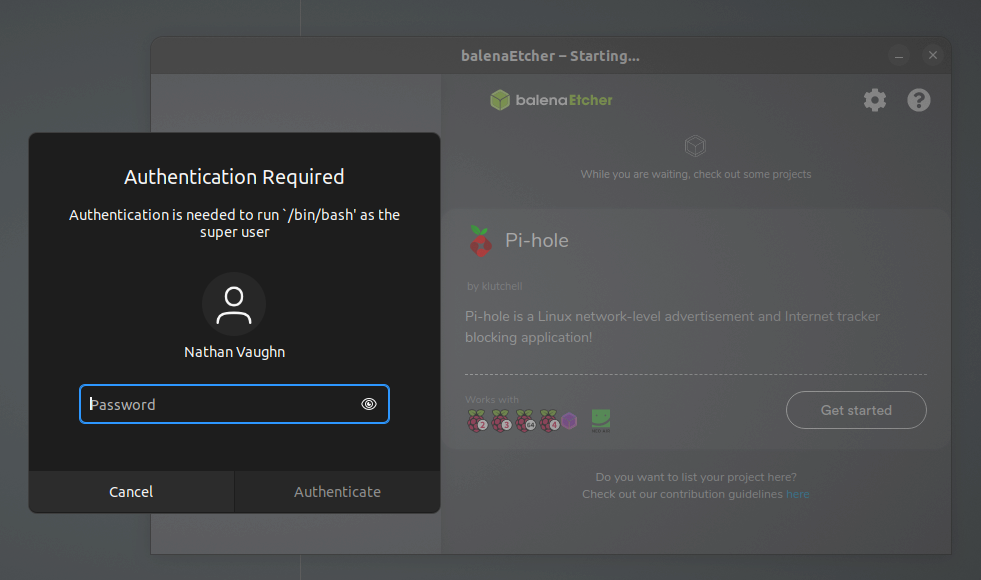
Enter your account credentials
Balena Etcher will begin flashing the microSD card and at the end will let you know when it’s finished.
2 - Connecting to the Jetson
You’ll need to login to your Jetson many times to setup and run software.
Out of the box, your Jetson will have a default user account called
avr with a password of bellavr22.
Here are 3 possible methods you can use.
Monitor and Keyboard
Possibly the simplest way to connect to your Jetson is with a monitor and keyboard. You’ll just need a monitor that has HDMI or DisplayPort that you can plug in to the Jetson.
Once at the desktop, you can open a terminal by clicking the application launcher in the bottom left (the 9 squares) or with the keyboard shortcut Ctrl+Alt+t.
Serial
If you do not have a monitor and keyboard, another method of logging in to your Jetson is over a serial connection. To do this, you’ll need a serial client.
Installing Serial Client
Installing Serial Client on Windows
For Windows, we recommend PuTTy.
Go to this page
and download and install the putty-64bit-<version>-installer.msi file.
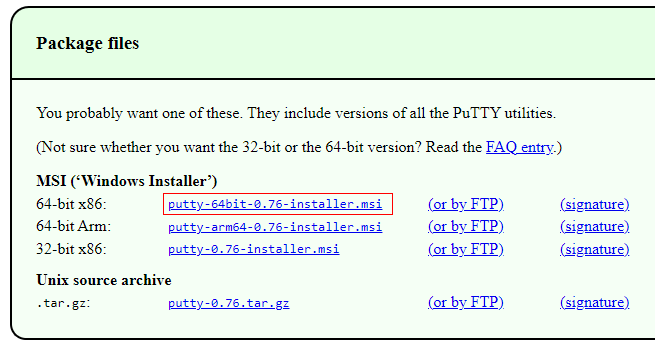
Download this installer file
Run through the setup wizard
Installing Serial Client on MacOS
Rather than using PuTTy, it’s much easier to open a terminal and simply run:
screen ttyACM0 115200
Installing Serial Client on Linux
You can follow the same steps as on MacOS
(after installing screen with sudo apt install screen),
but if you like a GUI, you can
install PuTTy with:
sudo apt install putty
and launch PuTTy with:
sudo putty
Connecting to Jetson via Serial Client
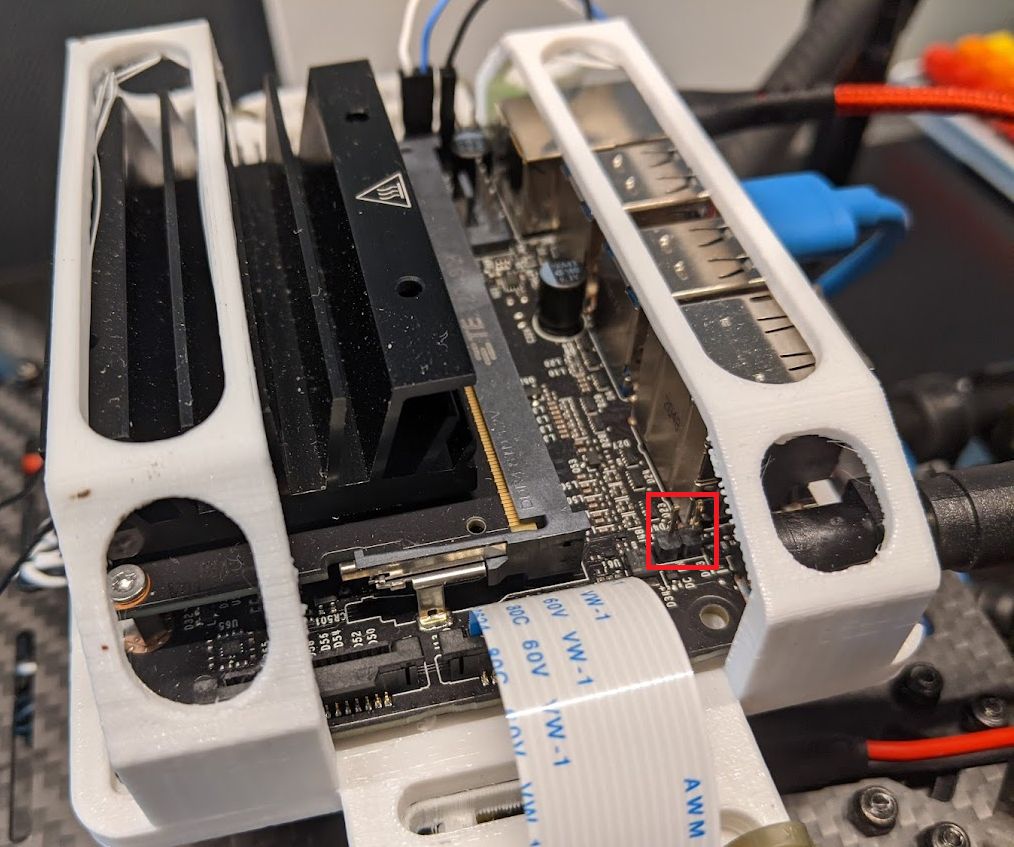
Now, if you want to power the Jetson via USB (if the Jetson is not connected to a wall adapter or a battery) remove the jumper behind the barrel jack.
Tip
Keep this somewhere safe, like sticking it to a piece of tape, it’s very easy to lose!Plug in a MicroUSB cable to the Jetson,
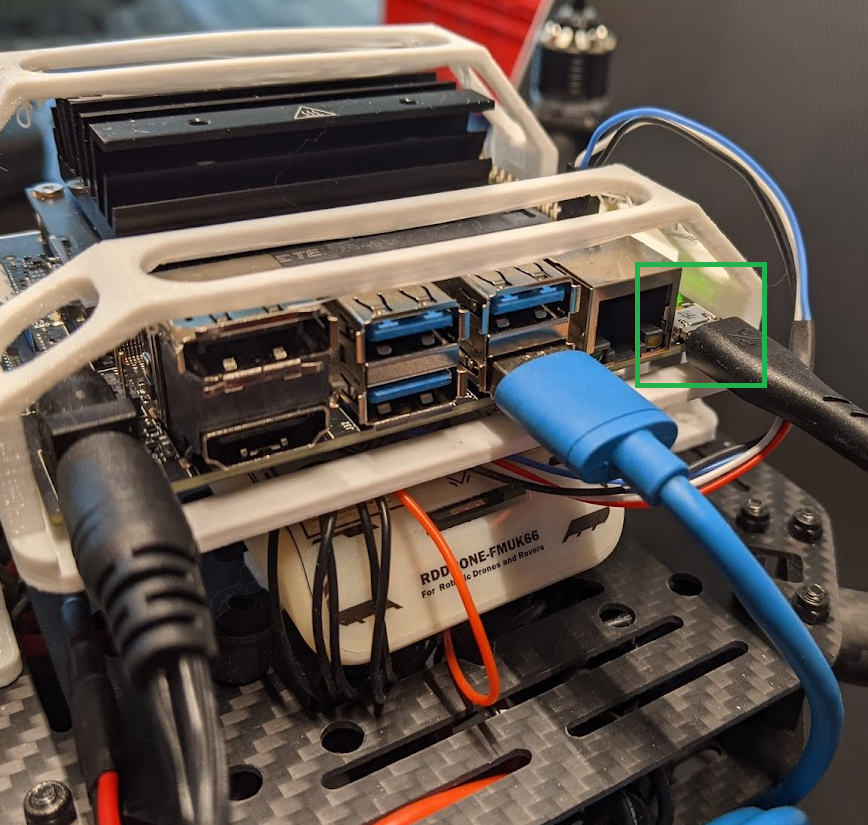
and then into your computer.
Tip
For Windows, open up Device Manager,

and find out what COM port your Jetson is on.
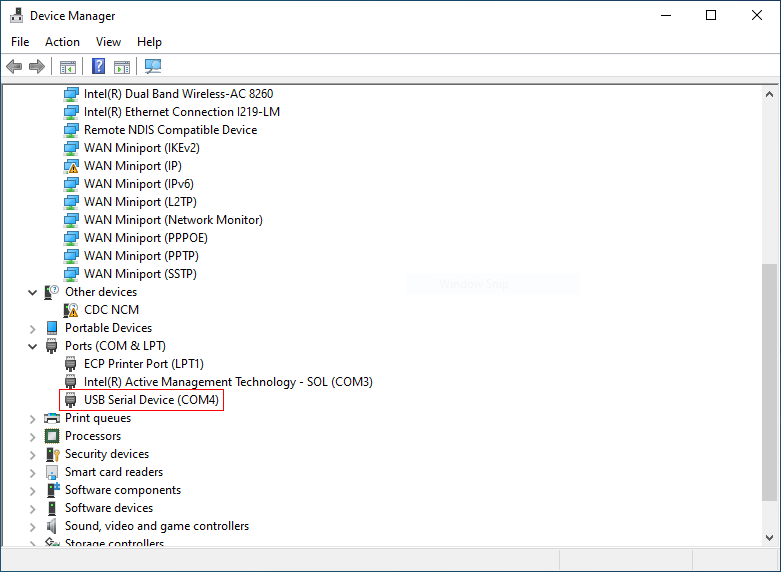
Look under Ports (COM & LPT). My Jetson enumerated as COM4
Open up PuTTy, choose the COM port or the serial device /dev/ttyACM0 for the
Serial line, and put in 115200 as speed.

Click “Open”. You should now see the Jetson’s terminal.
Tip
This method can also be helpful if you’ve already configured the Jetson to connect to a network, but don’t know what the IP address is.SSH
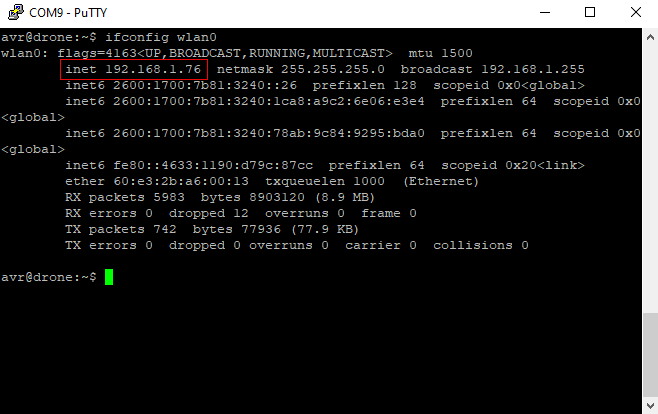
Note
This only works if you’ve already configured the operating system on the Jetson. If you’re setting up your Jetson from scratch, you’ll first need to start by using Monitor/Keyboard or Serial.In the future, you’ll want to use SSH to login to your Jetson, as it is far more convenient. SSH is way to login to a Linux system over a network. However, to do so, you’ll need to know the IP address of your Jetson. The simplest way to figure this out if you don’t know is to login via serial, and then run the command
ifconfig eth0
if you’ve connected the Jetson to ethernet or
ifconfig wlan0
if you’ve connected the Jetson to WiFi.
If you have yet to connect your jetson to the WiFi you can follow instructions for connecting to internet prior to returning to connect through ssh.
ssh Command
The quickest way to login to yor Jetson over SSH, is to use the builtin ssh command
in Windows. Open up a command prompt or PowerShell, and run
ssh <user>@<ip>
The first time you log in to your Jetson, you’ll be prompted to accept
the host’s key. Enter yes. You’ll thenbe prompted for your password,
and then you’ll be put into a terminal.
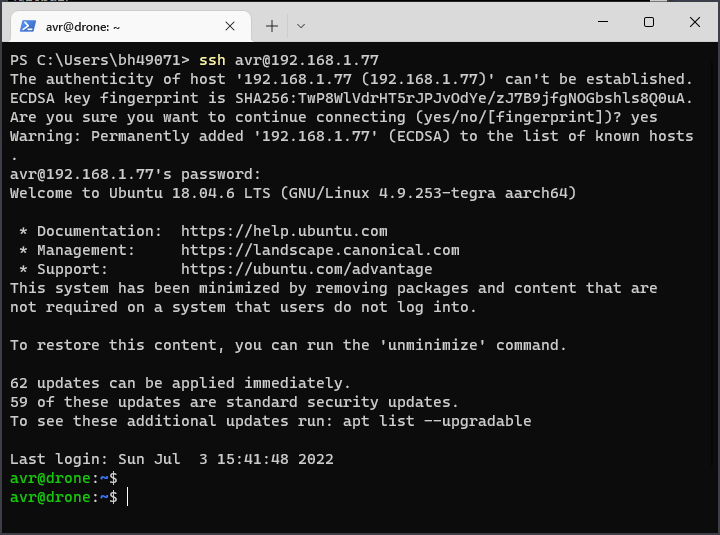
Command line SSH login
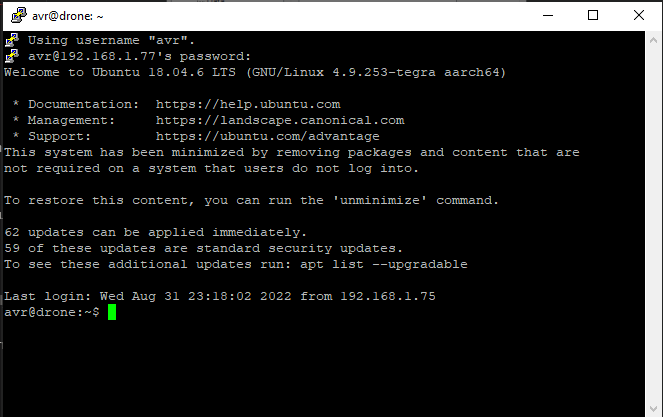
PuTTy
If you’re not comfortable with the command line, you can install PuTTy to connect
over SSH. Select the “SSH” button in PuTTy, put in the hostname field <user>@<ip>
and then click the “Open” button.

PuTTy SSH Login
Secondary popup window
You’ll need to accept that you trust a key the first time.
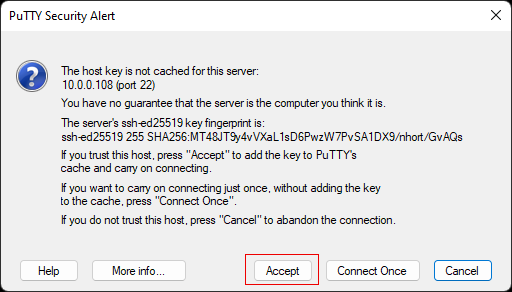
Accept the key
SSH Troubleshooting
Connection closed/reset
If you try to SSH into your Jetson, and you immediately get a connection timed out error, here’s how to fix it.
First, login to your Jetson via serial. Run the command
tail /var/log/auth.log
and see that you’re getting errors about invalid formats:
Jun 28 18:42:26 drone sshd[8547]: error: key_load_private: invalid format
Jun 28 18:42:26 drone sshd[8547]: error: key_load_public: invalid format
Jun 28 18:42:26 drone sshd[8547]: error: Could not load host key: /etc/ssh/ssh_host_ecdsa_key
Jun 28 18:42:26 drone sshd[8547]: error: key_load_private: invalid format
Jun 28 18:42:26 drone sshd[8547]: error: key_load_public: invalid format
Jun 28 18:42:26 drone sshd[8547]: error: Could not load host key: /etc/ssh/ssh_host_ed25519_key
Jun 28 18:42:26 drone sshd[8547]: fatal: No supported key exchange algorithms [preauth]
If so, run the command
sudo /usr/bin/ssh-keygen -A
to generate a new host key.
Note
You may need to delete or edit your ~/.ssh/known_hosts file after you do this.
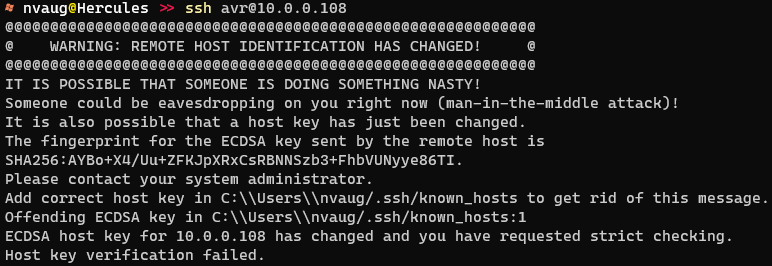
Host key verification failed
3 - Updating VMC Software
Connecting to Internet
In order to install the AVR software, your Jetson needs to have an internet connection. The easiest way by far is if you have ethernet available. If so, just plug an ethernet cable into your Jetson and you should be good to go.
If you don’t have ethernet, you can use a WiFi connection. First, you can list the available networks with:
nmcli device wifi list
Example:

WiFi network list
Hit q to exit the list.
If the Jetson is already connected to a WiFi network, you can disconnect it with:
sudo nmcli device disconnect wlan0
To connect to a WiFi network, run:
# with a password
sudo nmcli device wifi connect <network name> password <password>

# without a password
sudo nmcli device wifi connect <network name>
such as:
sudo nmcli device wifi connect "WI do drones FI" password "Flying_Is_Fun"
If your network name or password has a space or other special characters, you’ll need to wrap it in quotes as shown above.
Updating
Bell engineers are constantly working on improving the VMC software. If a new version is ever available, you just need to go into the directory the repo is cloned to, pull the latest code, and re-run the setup script:
There have been a lot of changes since your Jetson was preloaded with software.
Please ensure that you successfully run git pull in the following steps.
cd ~/AVR-2022/VMC/scripts
git pull
./setup.py
The setup.py script is safe to run at any time,
it won’t mess anything up by running it after everything is already configured.
Troubleshooting
Release is not valid yet
Example output:
Get:1 file:/var/cuda-repo-l4t-10-2-local  InRelease
Ign:1 file:/var/cuda-repo-l4t-10-2-local  InRelease
Get:2 file:/var/visionworks-repo  InRelease
Ign:2 file:/var/visionworks-repo  InRelease
Get:3 file:/var/visionworks-sfm-repo  InRelease
Ign:3 file:/var/visionworks-sfm-repo  InRelease
Get:4 file:/var/visionworks-tracking-repo  InRelease
Ign:4 file:/var/visionworks-tracking-repo  InRelease
Get:5 file:/var/cuda-repo-l4t-10-2-local  Release [564 B]
Get:6 file:/var/visionworks-repo  Release [2,001 B]
Get:7 file:/var/visionworks-sfm-repo  Release [2,005 B]
Get:5 file:/var/cuda-repo-l4t-10-2-local  Release [564 B]
Get:8 file:/var/visionworks-tracking-repo  Release [2,010 B]
Ign:9 https://repo.download.nvidia.com/jetson/common r32.7 InRelease
Get:6 file:/var/visionworks-repo  Release [2,001 B]
Get:7 file:/var/visionworks-sfm-repo  Release [2,005 B]
Get:8 file:/var/visionworks-tracking-repo  Release [2,010 B]
Ign:10 https://repo.download.nvidia.com/jetson/t210 r32.7 InRelease
Err:11 https://repo.download.nvidia.com/jetson/common r32.7 Release
  Certificate verification failed: The certificate is NOT trusted. The certificate chain uses not yet valid certificate.  Could not handshake: Error in the certificate verification. [IP: 23.221.220.78 443]
Err:12 https://repo.download.nvidia.com/jetson/t210 r32.7 Release
  Certificate verification failed: The certificate is NOT trusted. The certificate chain uses not yet valid certificate.  Could not handshake: Error in the certificate verification. [IP: 23.221.220.78 443]
Hit:13 http://ports.ubuntu.com/ubuntu-ports bionic InRelease
Get:15 http://ports.ubuntu.com/ubuntu-ports bionic-updates InRelease [88.7 kB]
Hit:18 http://ports.ubuntu.com/ubuntu-ports bionic-backports InRelease
Hit:19 http://ports.ubuntu.com/ubuntu-ports bionic-security InRelease
Reading package lists... Done
E: The repository 'https://repo.download.nvidia.com/jetson/common r32.7 Release' no longer has a Release file.
N: Updating from such a repository can't be done securely, and is therefore disabled by default.
N: See apt-secure(8) manpage for repository creation and user configuration details.
E: The repository 'https://repo.download.nvidia.com/jetson/t210 r32.7 Release' no longer has a Release file.
N: Updating from such a repository can't be done securely, and is therefore disabled by default.
N: See apt-secure(8) manpage for repository creation and user configuration details.
E: Release file for file:///var/cuda-repo-l4t-10-2-local/Release is not valid yet (invalid for another 2259d 1h 0min 15s). Updates for this repository will not be applied.
E: Release file for file:///var/visionworks-repo/Release is not valid yet (invalid for another 1888d 8h 9min 54s). Updates for this repository will not be applied.
E: Release file for file:///var/visionworks-sfm-repo/Release is not valid yet (invalid for another 1869d 23h 29min 17s). Updates for this repository will not be applied.
E: Release file for file:///var/visionworks-tracking-repo/Release is not valid yet (invalid for another 1869d 23h 30min 39s). Updates for this repository will not be applied.
E: Release file for http://ports.ubuntu.com/ubuntu-ports/dists/bionic/InRelease is not valid yet (invalid for another 1218d 5h 2min 38s). Updates for this repository will not be applied.
E: Release file for http://ports.ubuntu.com/ubuntu-ports/dists/bionic-updates/InRelease is not valid yet (invalid for another 2728d 6h 14min 58s). Updates for this repository will not be applied.
E: Release file for http://ports.ubuntu.com/ubuntu-ports/dists/bionic-backports/InRelease is not valid yet (invalid for another 2728d 5h 42min 43s). Updates for this repository will not be applied.
E: Release file for http://ports.ubuntu.com/ubuntu-ports/dists/bionic-security/InRelease is not valid yet (invalid for another 2728d 5h 39min 48s). Updates for this repository will not be applied.
This usually means your system’s time is not correct. Try running the following commands to force your system to correct its time.
# After each attempt, run the `date` command to check the time to see if it worked

# Option 1:
sudo hwclock --hctosys

# Option 2:
sudo timedatectl set-ntp off
sudo timedatectl set-ntp on

# Option 3:
sudo service systemd-timesyncd restart

# Option 4:
# This is a final brute-force option that is not recommended.
# Substitute in the date and time you're running the command at
sudo date -s '2022-12-25 12:34:56'
ZED camera not detected
Example output:
WARNING: ZED camera not detected, skipping settings download
Obviously, make sure your ZED Mini camera is plugged in to the Jetson. If not, plug it in and re-run the setup script.
However, if it is, this sometimes happens because of a finnicky USB detection. Try running the setup script once or twice more, and unplug the camera and plug it back in until it picks it up and works.
Connection Issues
Example output:
Get:1 file:/var/cuda-repo-l4t-10-2-local  InRelease
Ign:1 file:/var/cuda-repo-l4t-10-2-local  InRelease
Get:2 file:/var/visionworks-repo  InRelease
Ign:2 file:/var/visionworks-repo  InRelease
Get:3 file:/var/visionworks-sfm-repo  InRelease
Ign:3 file:/var/visionworks-sfm-repo  InRelease
Get:4 file:/var/visionworks-tracking-repo  InRelease
Ign:4 file:/var/visionworks-tracking-repo  InRelease
Get:5 file:/var/cuda-repo-l4t-10-2-local  Release [564 B]
Err:6 http://ports.ubuntu.com/ubuntu-ports bionic InRelease
  Could not connect to ports.ubuntu.com:80 (0.0.0.0). - connect (111: Connection refused)
Err:7 http://ports.ubuntu.com/ubuntu-ports bionic-updates InRelease
  Unable to connect to ports.ubuntu.com:http:
Err:8 http://ports.ubuntu.com/ubuntu-ports bionic-backports InRelease
  Unable to connect to ports.ubuntu.com:http:
Err:9 http://ports.ubuntu.com/ubuntu-ports bionic-security InRelease
  Unable to connect to ports.ubuntu.com:http:
Get:10 file:/var/visionworks-repo  Release [2,001 B]
Get:11 file:/var/visionworks-sfm-repo  Release [2,005 B]
Get:5 file:/var/cuda-repo-l4t-10-2-local  Release [564 B]
Get:12 file:/var/visionworks-tracking-repo  Release [2,010 B]
Get:10 file:/var/visionworks-repo  Release [2,001 B]
Get:11 file:/var/visionworks-sfm-repo  Release [2,005 B]
Get:12 file:/var/visionworks-tracking-repo  Release [2,010 B]
Hit:13 https://repo.download.nvidia.com/jetson/common r32.7 InRelease
Get:14 https://repo.download.nvidia.com/jetson/t210 r32.7 InRelease [2,550 B]
Fetched 2,550 B in 1s (1,843 B/s)
Reading package lists... Done
Building dependency tree
Reading state information... Done
All packages are up to date.
W: Failed to fetch http://ports.ubuntu.com/ubuntu-ports/dists/bionic/InRelease  Could not connect to ports.ubuntu.com:80 (0.0.0.0). - connect (111: Connection refused)
W: Failed to fetch http://ports.ubuntu.com/ubuntu-ports/dists/bionic-updates/InRelease  Unable to connect to ports.ubuntu.com:http:
W: Failed to fetch http://ports.ubuntu.com/ubuntu-ports/dists/bionic-backports/InRelease  Unable to connect to ports.ubuntu.com:http:
W: Failed to fetch http://ports.ubuntu.com/ubuntu-ports/dists/bionic-security/InRelease  Unable to connect to ports.ubuntu.com:http:
W: Some index files failed to download. They have been ignored, or old ones used instead.
If the setup script fails to download something, it likely lost connection to the internet, or your network is blocking a site it tried to download content from. Try running the script again.
If that still does not work, look at the VMC software README at https://github.com/bellflight/AVR-2022/tree/main/VMC/README.md and the provided list of domain names that the setup script connects to. Either see if your network administrator can allow these domain names, or use a personal hotspot or internet connection.
4 - Running VMC Software
Networking
Before running the VMC software, we highly recommend that you configure
the Jetson to act as it’s own WiFi network you can connect to. To do this,
login to the Jetson, go into the “VMC” directory,
and run the command ./scripts/wifi.py create:
cd ~/AVR-2022/VMC/
./scripts/wifi.py create
This will walk you through creating a WiFi network that you can connect to.
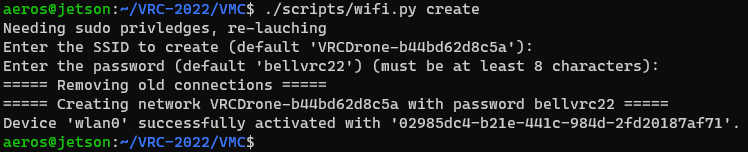
WiFi setup wizard
Tip
You can also use the the disconnect command to disconnect from all WiFi networks
and disable the hotspot, or the connect command to more easily connect to an
existing WiFi network.
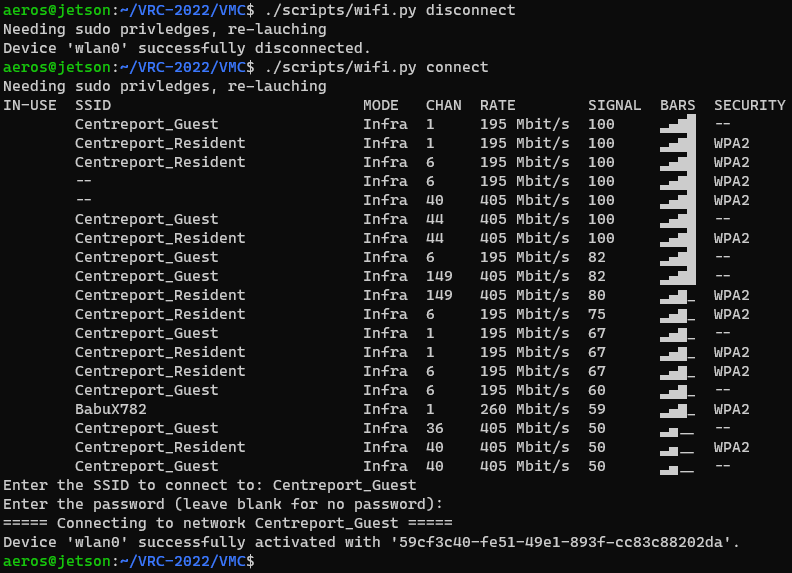
Disconnect/Connect to WiFi networks
After connecting to the WiFi network, your Jetson will always have the IP address
10.42.0.1, which you can use to
connect to via SSH.
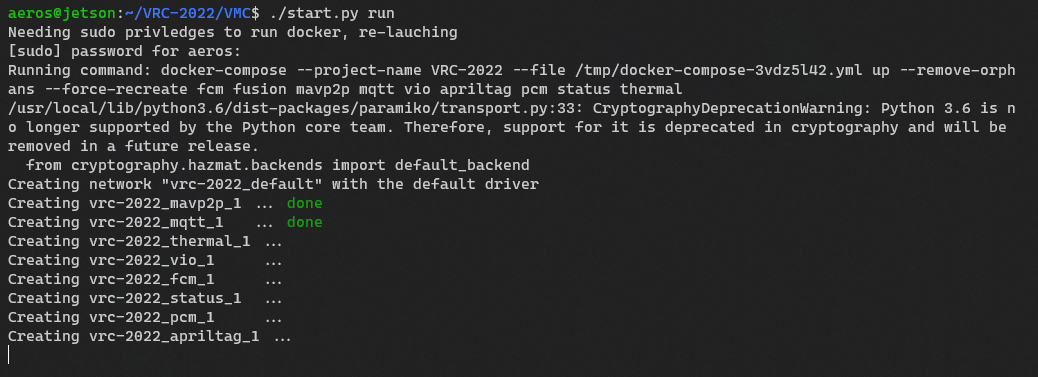
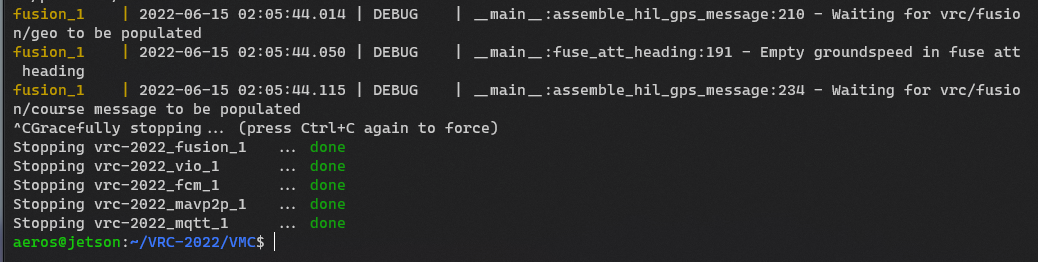
Running
After connecting to your Jetson via the hotspot, go into the “VMC” directory,
and run the command ./start.py run:
cd ~/AVR-2022/VMC/
./start.py run
To shutdown the software, press Ctrl+C in the console window you started the software in. Additionally, run
./start.py stop
for good measure.
Options
With the basics out of the way, there are some options that can be used to control which parts of the software are run. By default, a normal set of modules are run:
./start.py run
# also equivalent to
./start.py run --norm
./start.py run -n
- fcm
- fusion
- mavp2p
- mqtt
- vio
- apriltag
- pcm
- status
- thermal
However, let’s say you have just the bare minimum equipment installed on your drone
(just the ZED Mini camera). You can use the --min option to run only the
following modules which are the bare minimum required for flight:
./start.py run --min
# also equivalent to
./start.py run -m
- fcm
- fusion
- mavp2p
- mqtt
- vio
On the other hand, if you have everything installed, and also
want to run your own code in the sandbox module you can use the --all option:
./start.py run --all
# also equivalent to
./start.py run -a
- fcm
- fusion
- mavp2p
- mqtt
- vio
- apriltag
- pcm
- status
- thermal
- sandbox
Lastly, if you want to run modules not defined in a preset here, you can either list them all out explicitly, or add the additional modules you want to an exisiting alias:
# the following are equivalent
./start.py run pcm --min # the --min must come at the end
./start.py run fcm vio mqtt mavp2p fusion pcm
If you ever need help, just add the --help argument to the command:
usage: start.py [-h] [-l] [-m | -n | -a] {run,build,pull,stop} [modules ...]

positional arguments:
  {run,build,pull,stop}
                        Action to perform
  modules               Explicitly list which module(s) to perform the action one

optional arguments:
  -h, --help            show this help message and exit
  -l, --local           Build containers locally rather than using pre-built ones from GitHub
  -m, --min             Perform action on minimal modules (fcm, fusion, mavp2p, mqtt, vio). Adds to any modules explicitly specified.
  -n, --norm            Perform action on normal modules (apriltag, fcm, fusion, mavp2p, mqtt, pcm, status, thermal, vio). Adds to any modules explicitly specified. If nothing else is specified, this
                        is the default.
  -a, --all             Perform action on all modules (apriltag, fcm, fusion, mavp2p, mqtt, pcm, sandbox, status, thermal, vio). Adds to any modules explicitly specified.
Troubleshooting
Sometimes when starting the AVR software, things don’t all start correctly.
Cannot start service pcm
Example output:
Needing sudo privileges to run docker, re-launching
Running command: docker-compose --project-name AVR-2022 --file /tmp/docker-compose-v5eqlg13.yml up --remove-orphans --force-recreate pcm
/usr/local/lib/python3.6/dist-packages/paramiko/transport.py:33: CryptographyDeprecationWarning: Python 3.6 is no longer supported by the Python core team. Therefore, support for it is deprecated in cryptography and will be removed in a future release.
  from cryptography.hazmat.backends import default_backend
Creating network "avr-2022_default" with the default driver
Creating avr-2022_mqtt_1 ... done
Creating avr-2022_pcm_1  ... error

ERROR: for avr-2022_pcm_1  Cannot start service pcm: error gathering device information while adding custom device "/dev/ttyACM0": no such file or directory

ERROR: for pcm  Cannot start service pcm: error gathering device information while adding custom device "/dev/ttyACM0": no such file or directory
ERROR: Encountered errors while bringing up the project.
This error means that the AVR software was unable to connect to the PCC. If you are not using the PCC, follow the steps above to disable that module.
Otherwise, to test that the PCC is correctly connected to the VMC, run the command:
ls /dev/ttyACM0
You’ll get the message ls: cannot access '/dev/ttyACM0': No such file or directory
if the PCC is not connected. If the PCC is connected,
/dev/ttyACM0 will get echoed back.
Try unplugging the PCC and plugging it back into the VMC.
5 - Connecting QGC
Once you have the VMC software running on your drone, you’ll want to connect QGroundControl to it. While not strictly required for anything, it helps with keeping an eye on the battery percentage remaining, and ensuring the correct flight mode is selected.
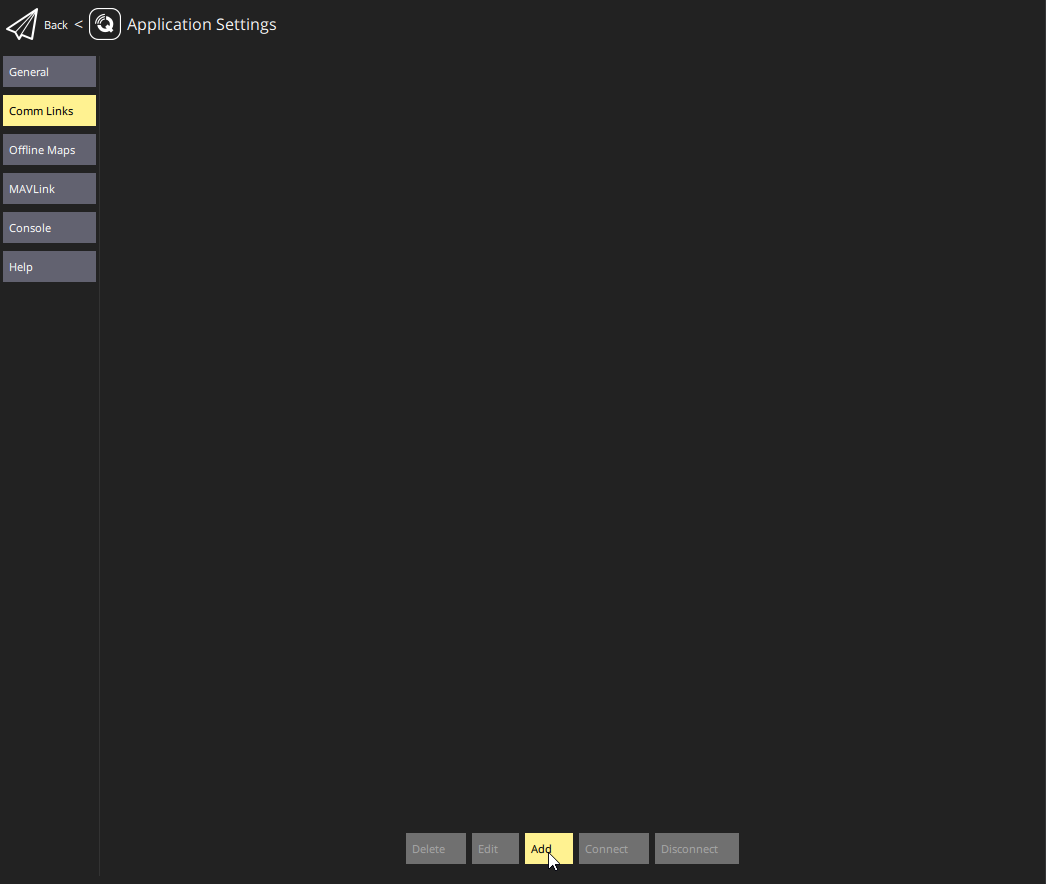
Open QGroundControl, click on the purple “Q” in the top left, then go to “Application Settings”. Now, go to “Comm Links” and then click “Add” at the bottom.
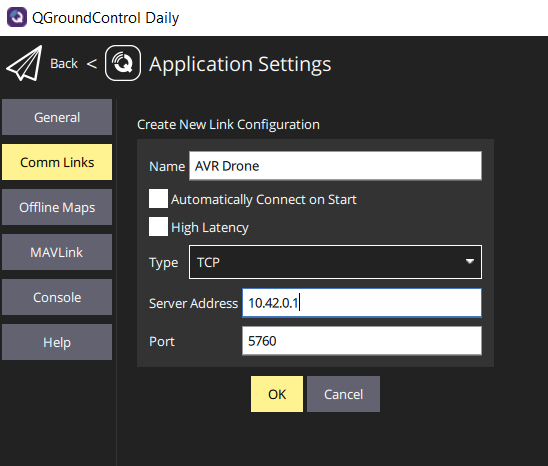
Now, enter a name for this connection, select type of “TCP”, enter the IP address of your drone, and leave the port number to the default of 5760. Click “Ok” to add it.
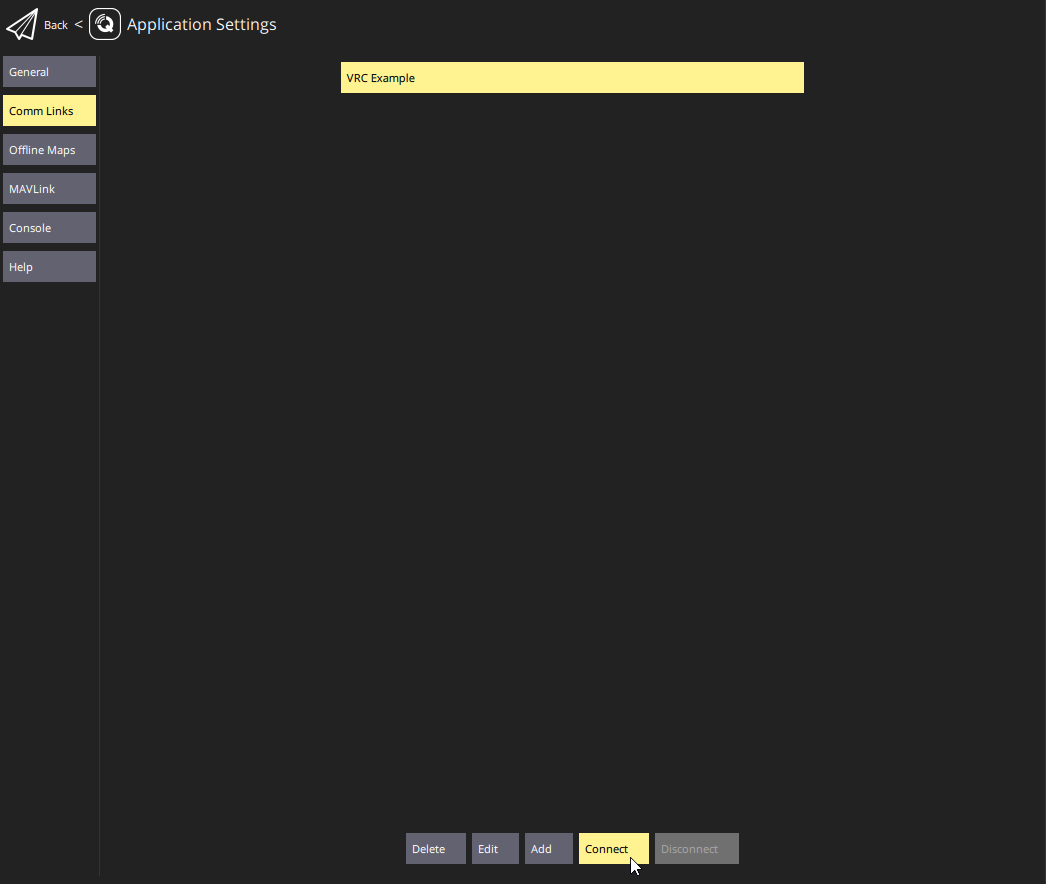
Now whenever you want to connect QGC to your done, go back to “Application Settings”, “Comm Links”, select your connection, and click “Connect” at the bottom.
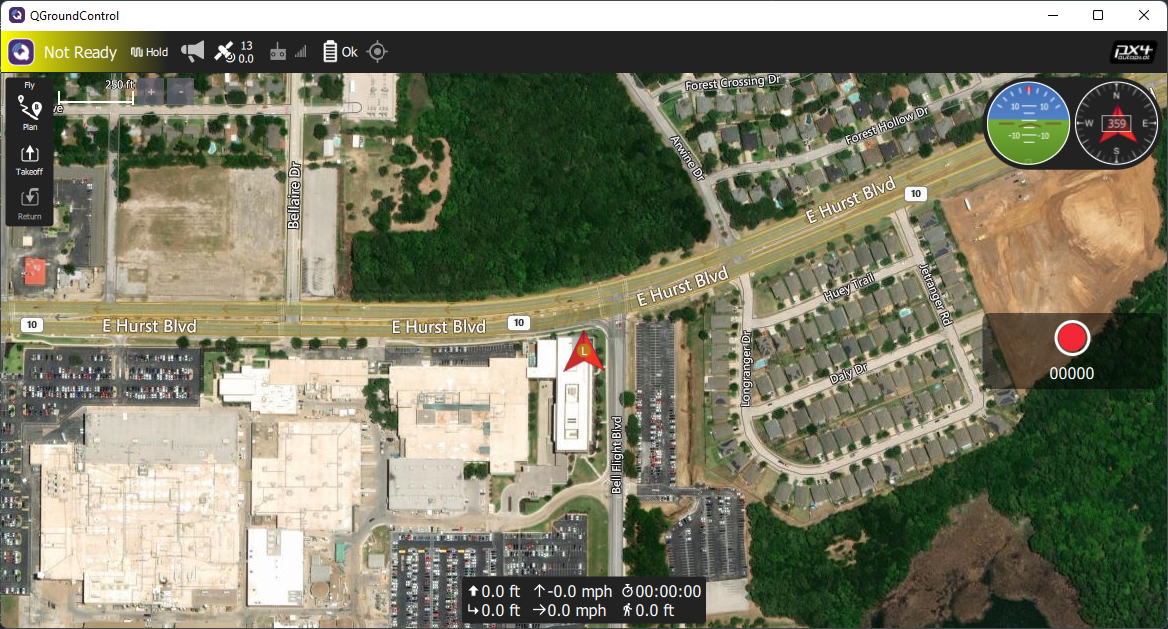
Go back to the main QGC screen and you should see your drone at the Bell headquarters with 13 satellites visible.
6 - Flight Controller Parameters
After configuring the AVR software on your Jetson, you need to also load custom parameters into your flight controller as well. These settings configure how the flight controller processes sensor input, and we need to tell it to unconditionally trust the data the AVR software feeds it.
First, download this parameter file from GitHub: https://github.com/bellflight/AVR-2022/blob/main/PX4/Params/AVR2022Params.params
The easiest way to download the file is to click the “Raw” button, then right-click the page, and select “Save page as”.
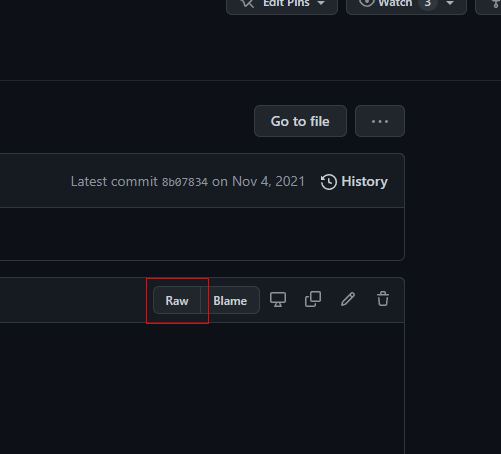
The location of the “Raw” button
Like flashing the flight controller firmware, you’ll need to plug in the FC to your computer with the MicroUSB cable.
Now, open QGroundControl, click the “Q” in the top left, then “Vehicle Setup” then “Parameters” at the bottom of the list.
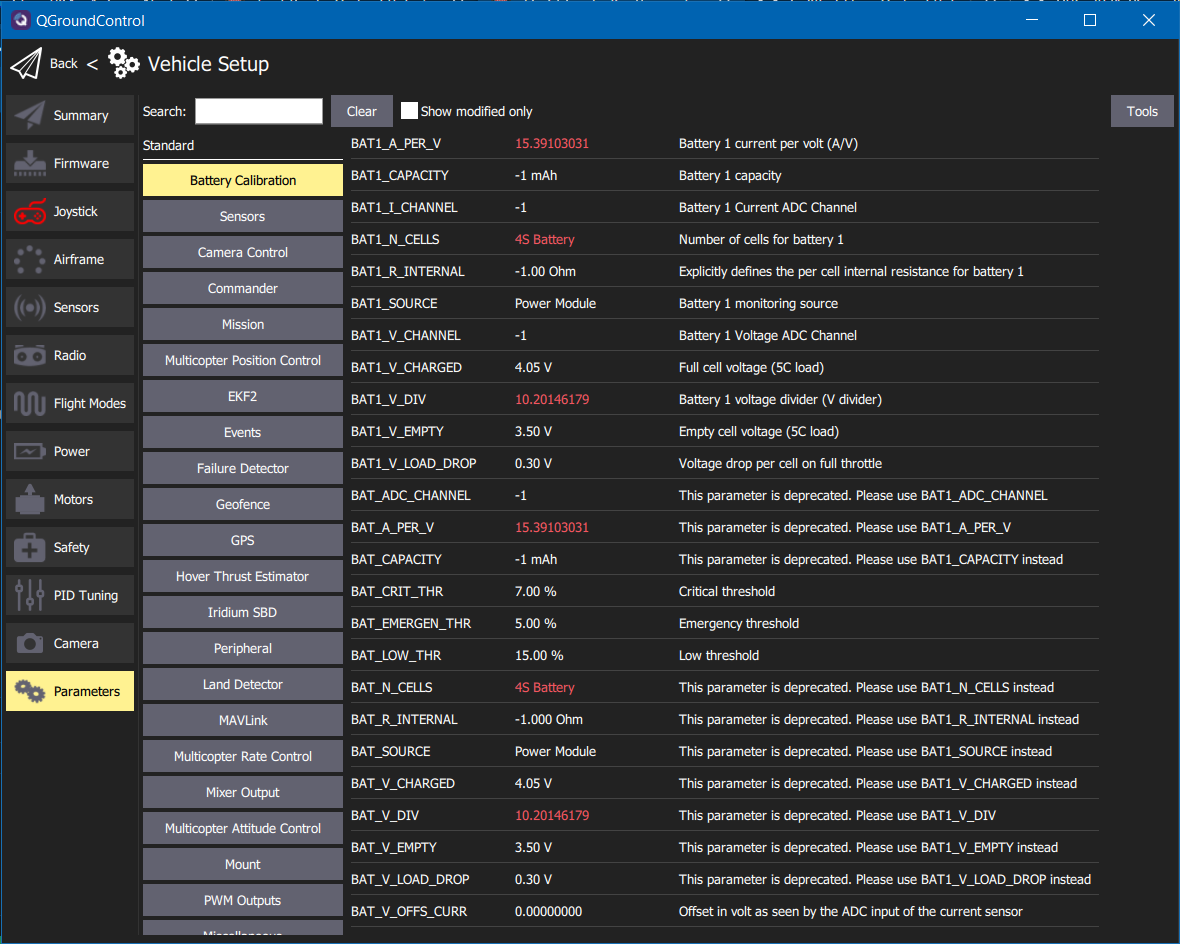
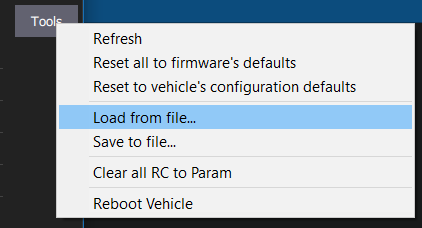
Click on “Tools” in the top right then select “Load from file…” and select the AVR parameter file you downloaded.
Then click “Ok” to load the parameters.
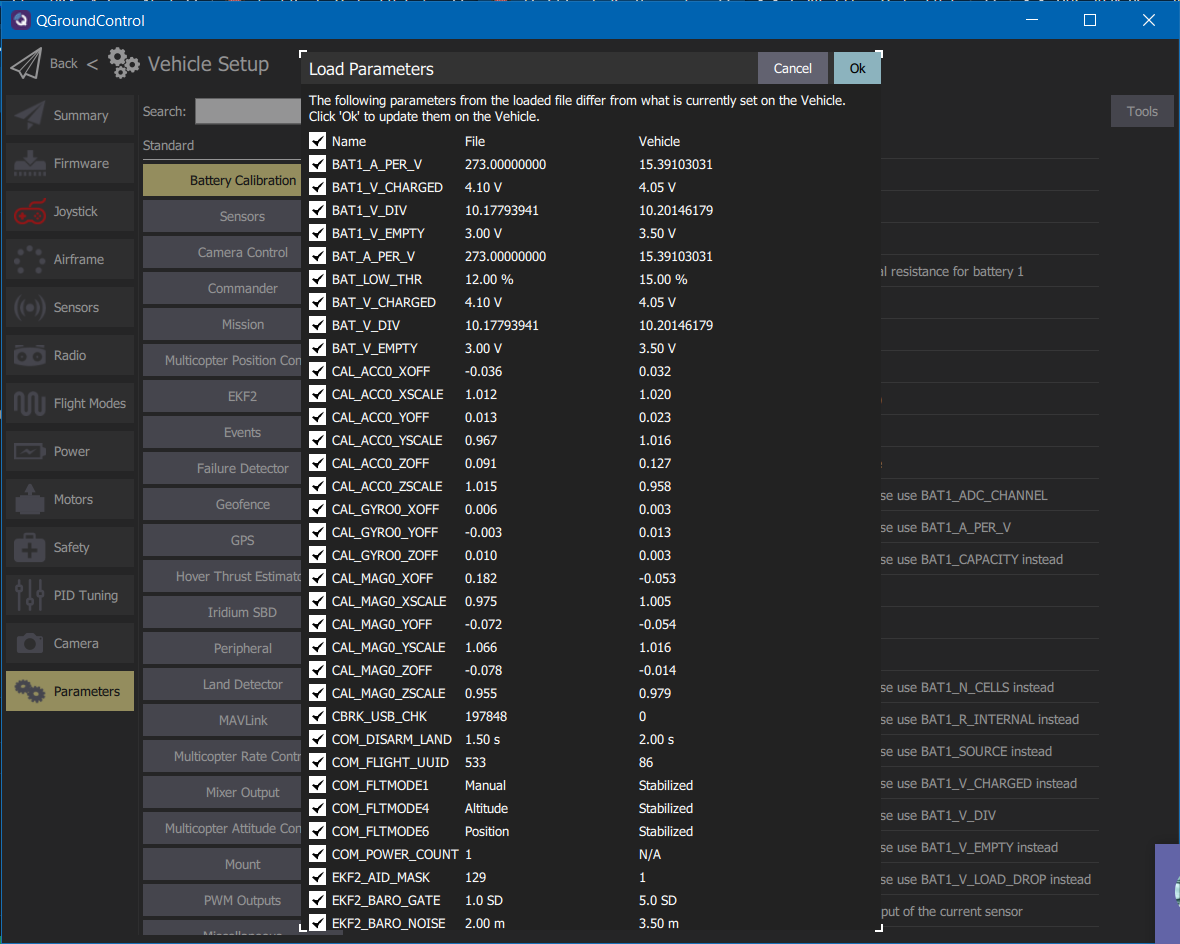
Then click “Ok” a bunch of times as QGroundControl informs you that many parameter changes requires a vehicle reboot.
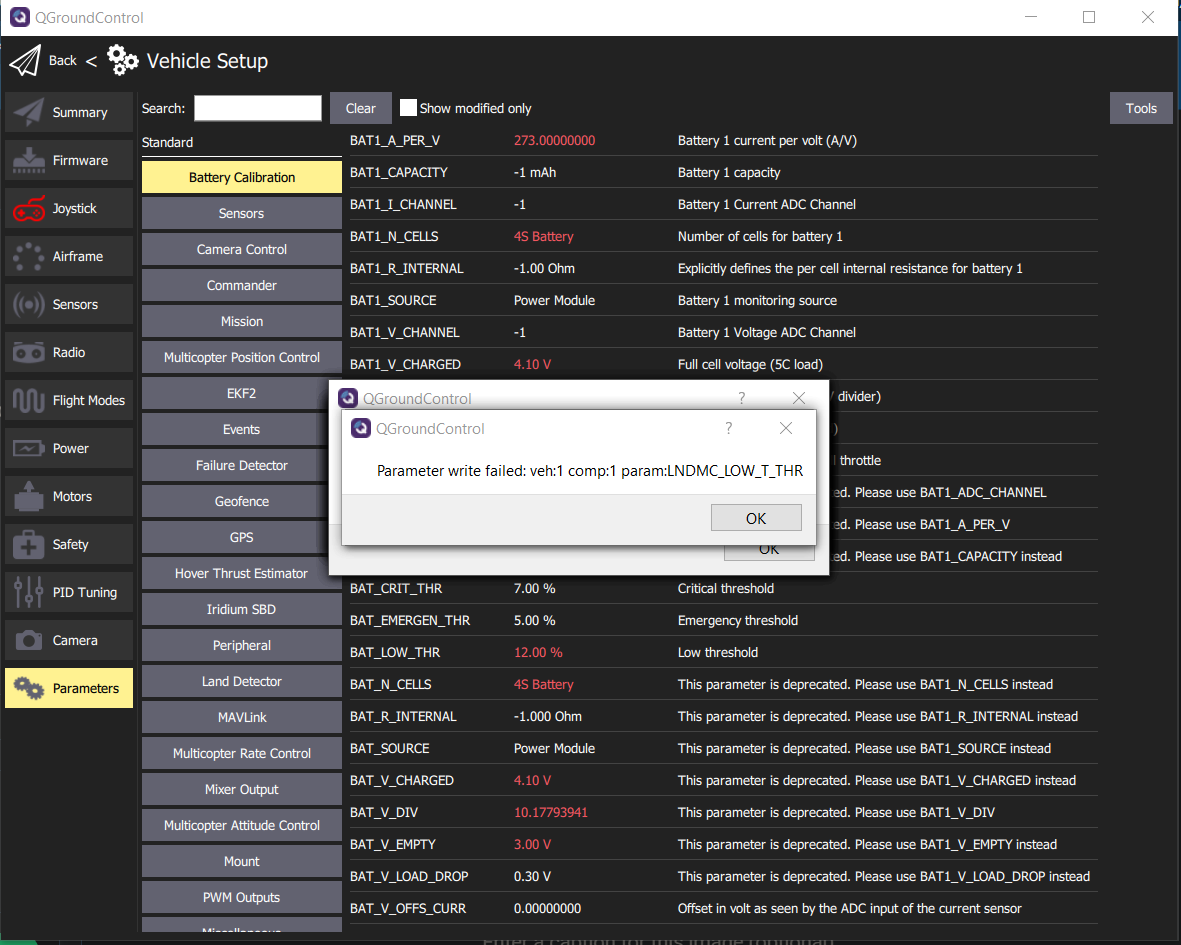
Then go back to “Tools” and select “Reboot Vehicle” at the bottom of the list to restart the flight controller for the parameters to take effect.
7 - GUI
Setup
You should have already setup the AVR GUI when testing your PCC here.
Usage
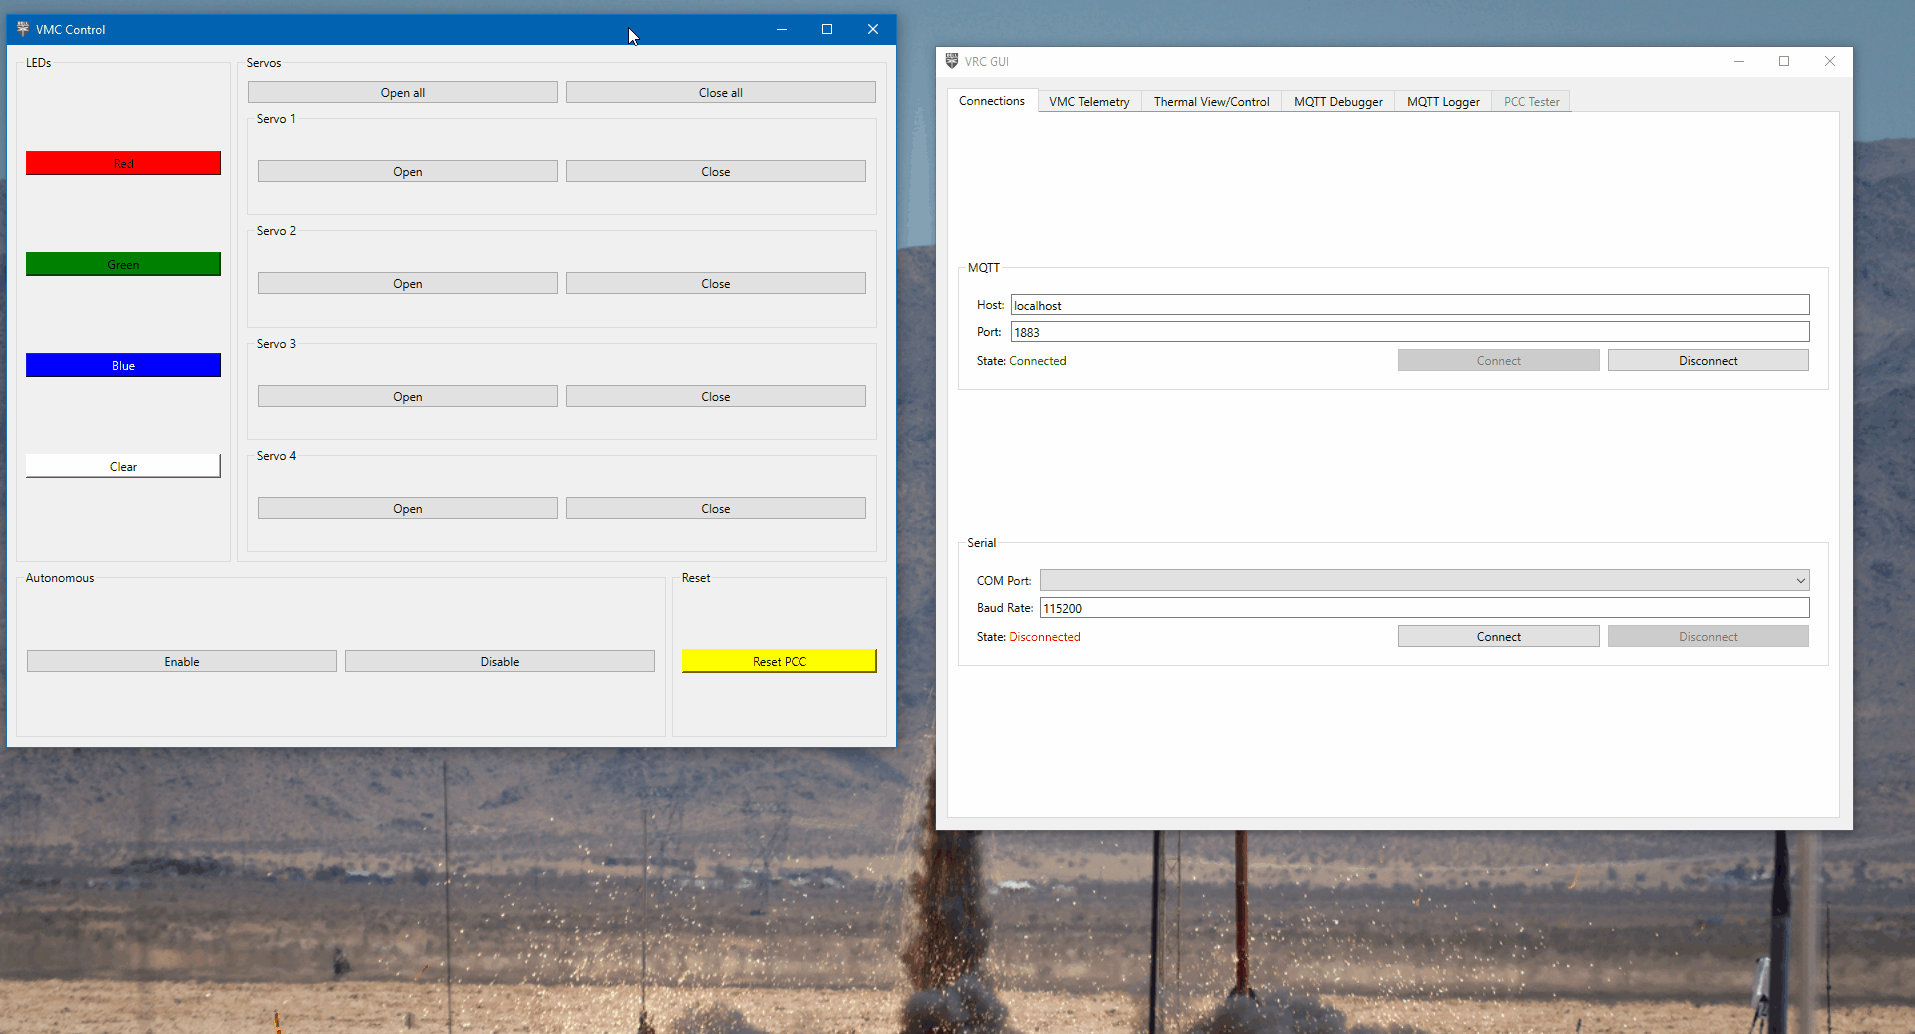
Open the application. You’ll be brought to the Connections tab. After starting the AVR software on your Jetson, put in the Jetson’s IP address under the “MQTT” section. Leave the port as is.
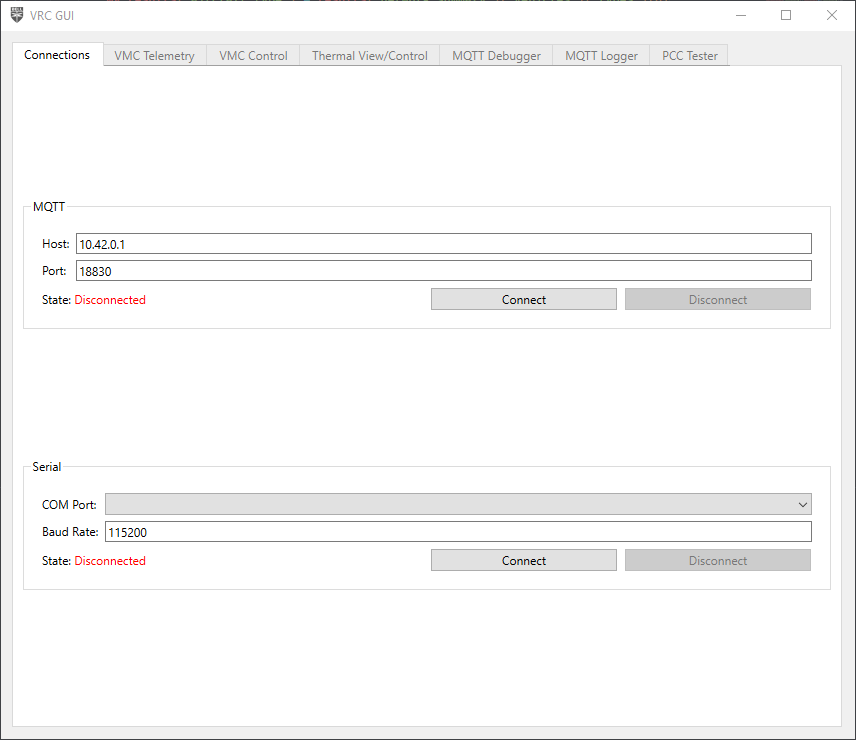
Connections tab
Click “Connect”, and make sure the application properly connects.

Connection state
If the application is unable to connect to your drone, the state will show as “Failure”. Make sure the software is running, and you got the IP address correct.
After the application connects, all the VMC-related tabs will become enabled.
Tabs
The functionality of the application is broken up into multiple tabs. These tabs are automatically enabled/disabled based on the connectivity currently available. These tabs can be re-ordered as desired. Additionally, the tabs can be popped out into separate windows to create a multi-pane view, either by double clicking the tab, or right-clicking and selecting “Pop out”.
You can also double-click to pop out a tab
To reattach a tab, just close the window.
Re-attaching a tab
VMC Telemetry
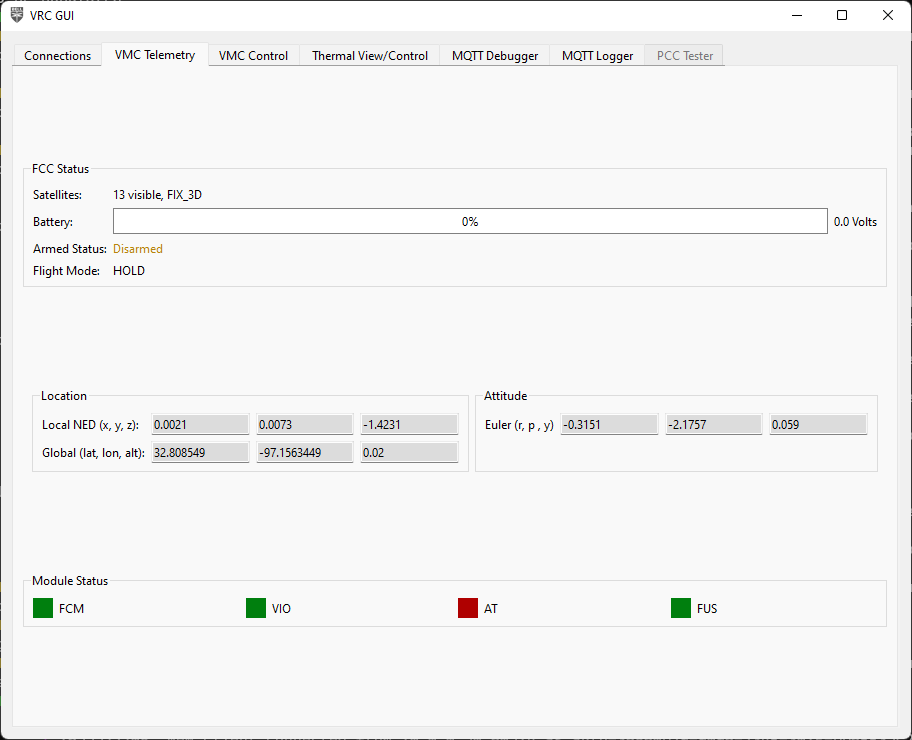
VMC Telemetry Tab
This tab is a sort of QGroundControl “Lite” that shows the most important telemetry information from the drone. This is NOT a full replacement for QGroundControl, but quick view of important information while your drone is flying.
At the top is the status of the flight controller, with information about the current GPS fix, battery level and voltage, armed status, and selected flight mode.
In the middle is the current location of the drone in local and global coordinates, along with the current attitude of the drone in roll, pitch, yaw.
Finally, at the bottom is a display of the status of the software modules required for stabilized flight and April Tag detection. These indicators will turn green once MQTT messages are received from a module, and will turn red if more than a second has elapsed since the last received message.

Module status indicators
If all 4 indicators are green, you are good to fly!
VMC Control
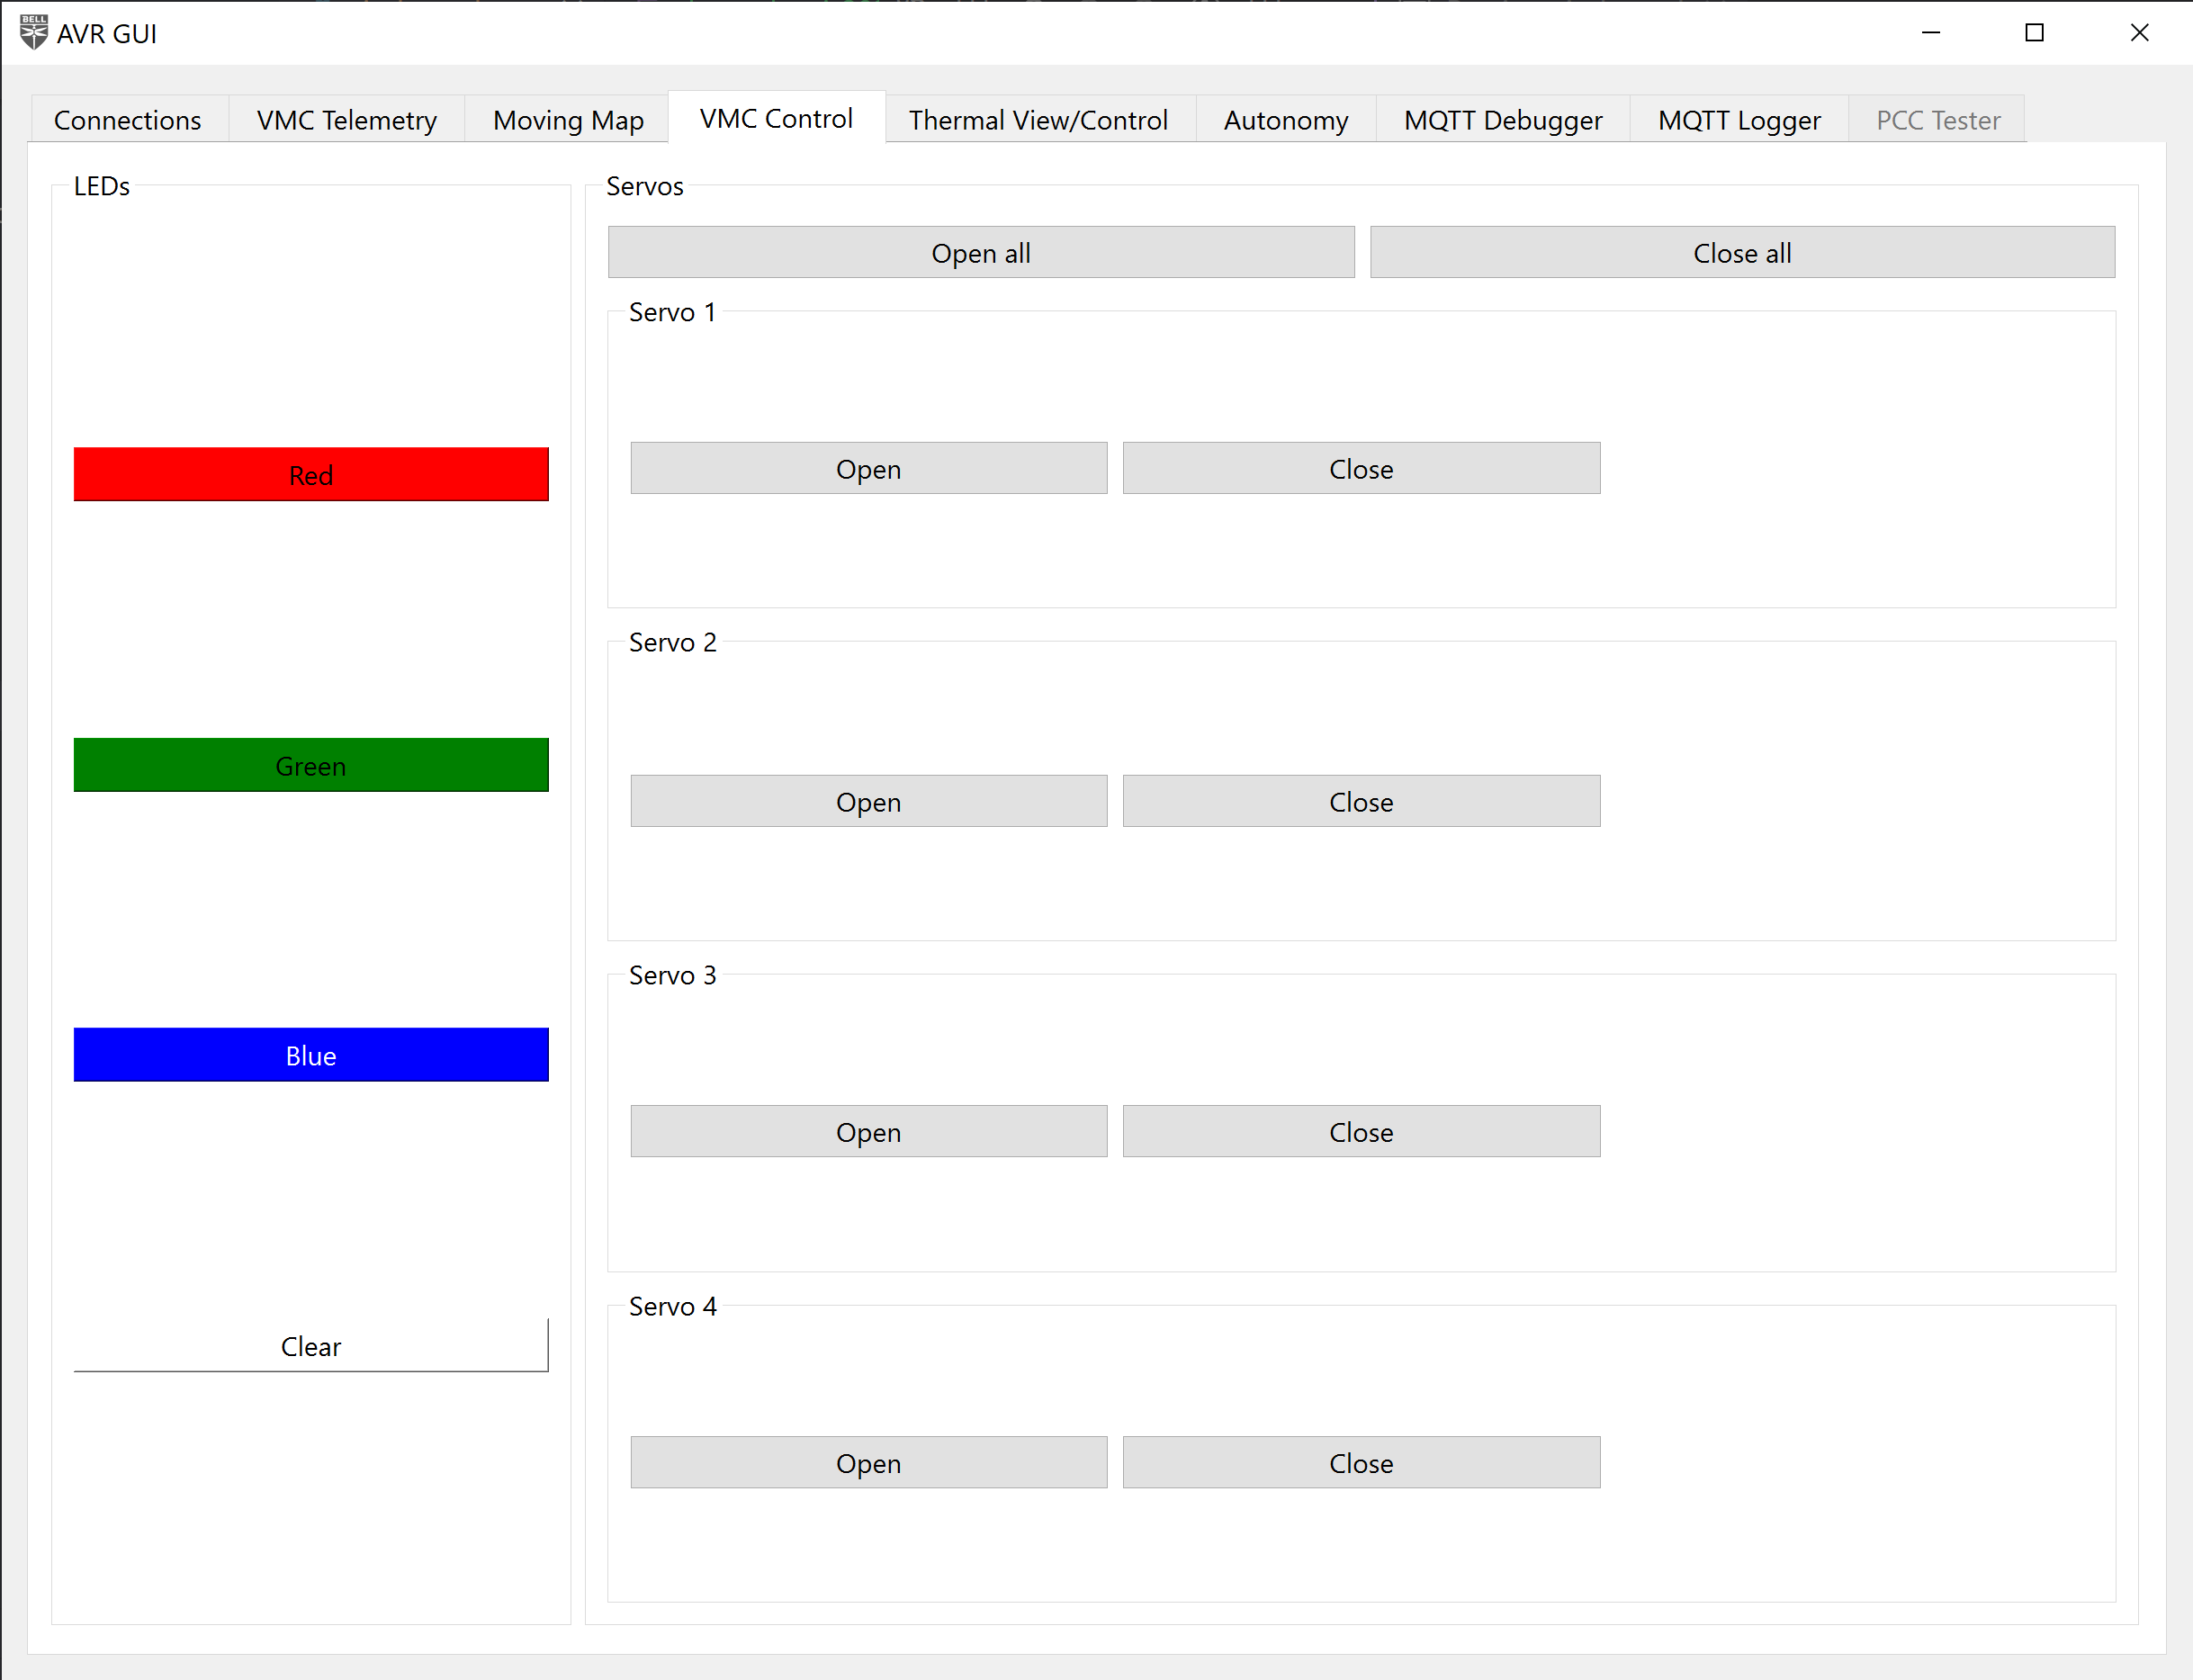
VMC Control Tab
This tab allows you to control various aspects of the drone, including the LEDs, and servos connected to the PCC.
Click the individual open/close buttons to open/close individual servos, or click the open/close all buttons at the top of open/close all of the servos at once.
Click the color buttons to change the color of the LEDs to one of the presets (red, green, blue). The “clear” button at the bottom turns off the LEDs.
Autonomy Control
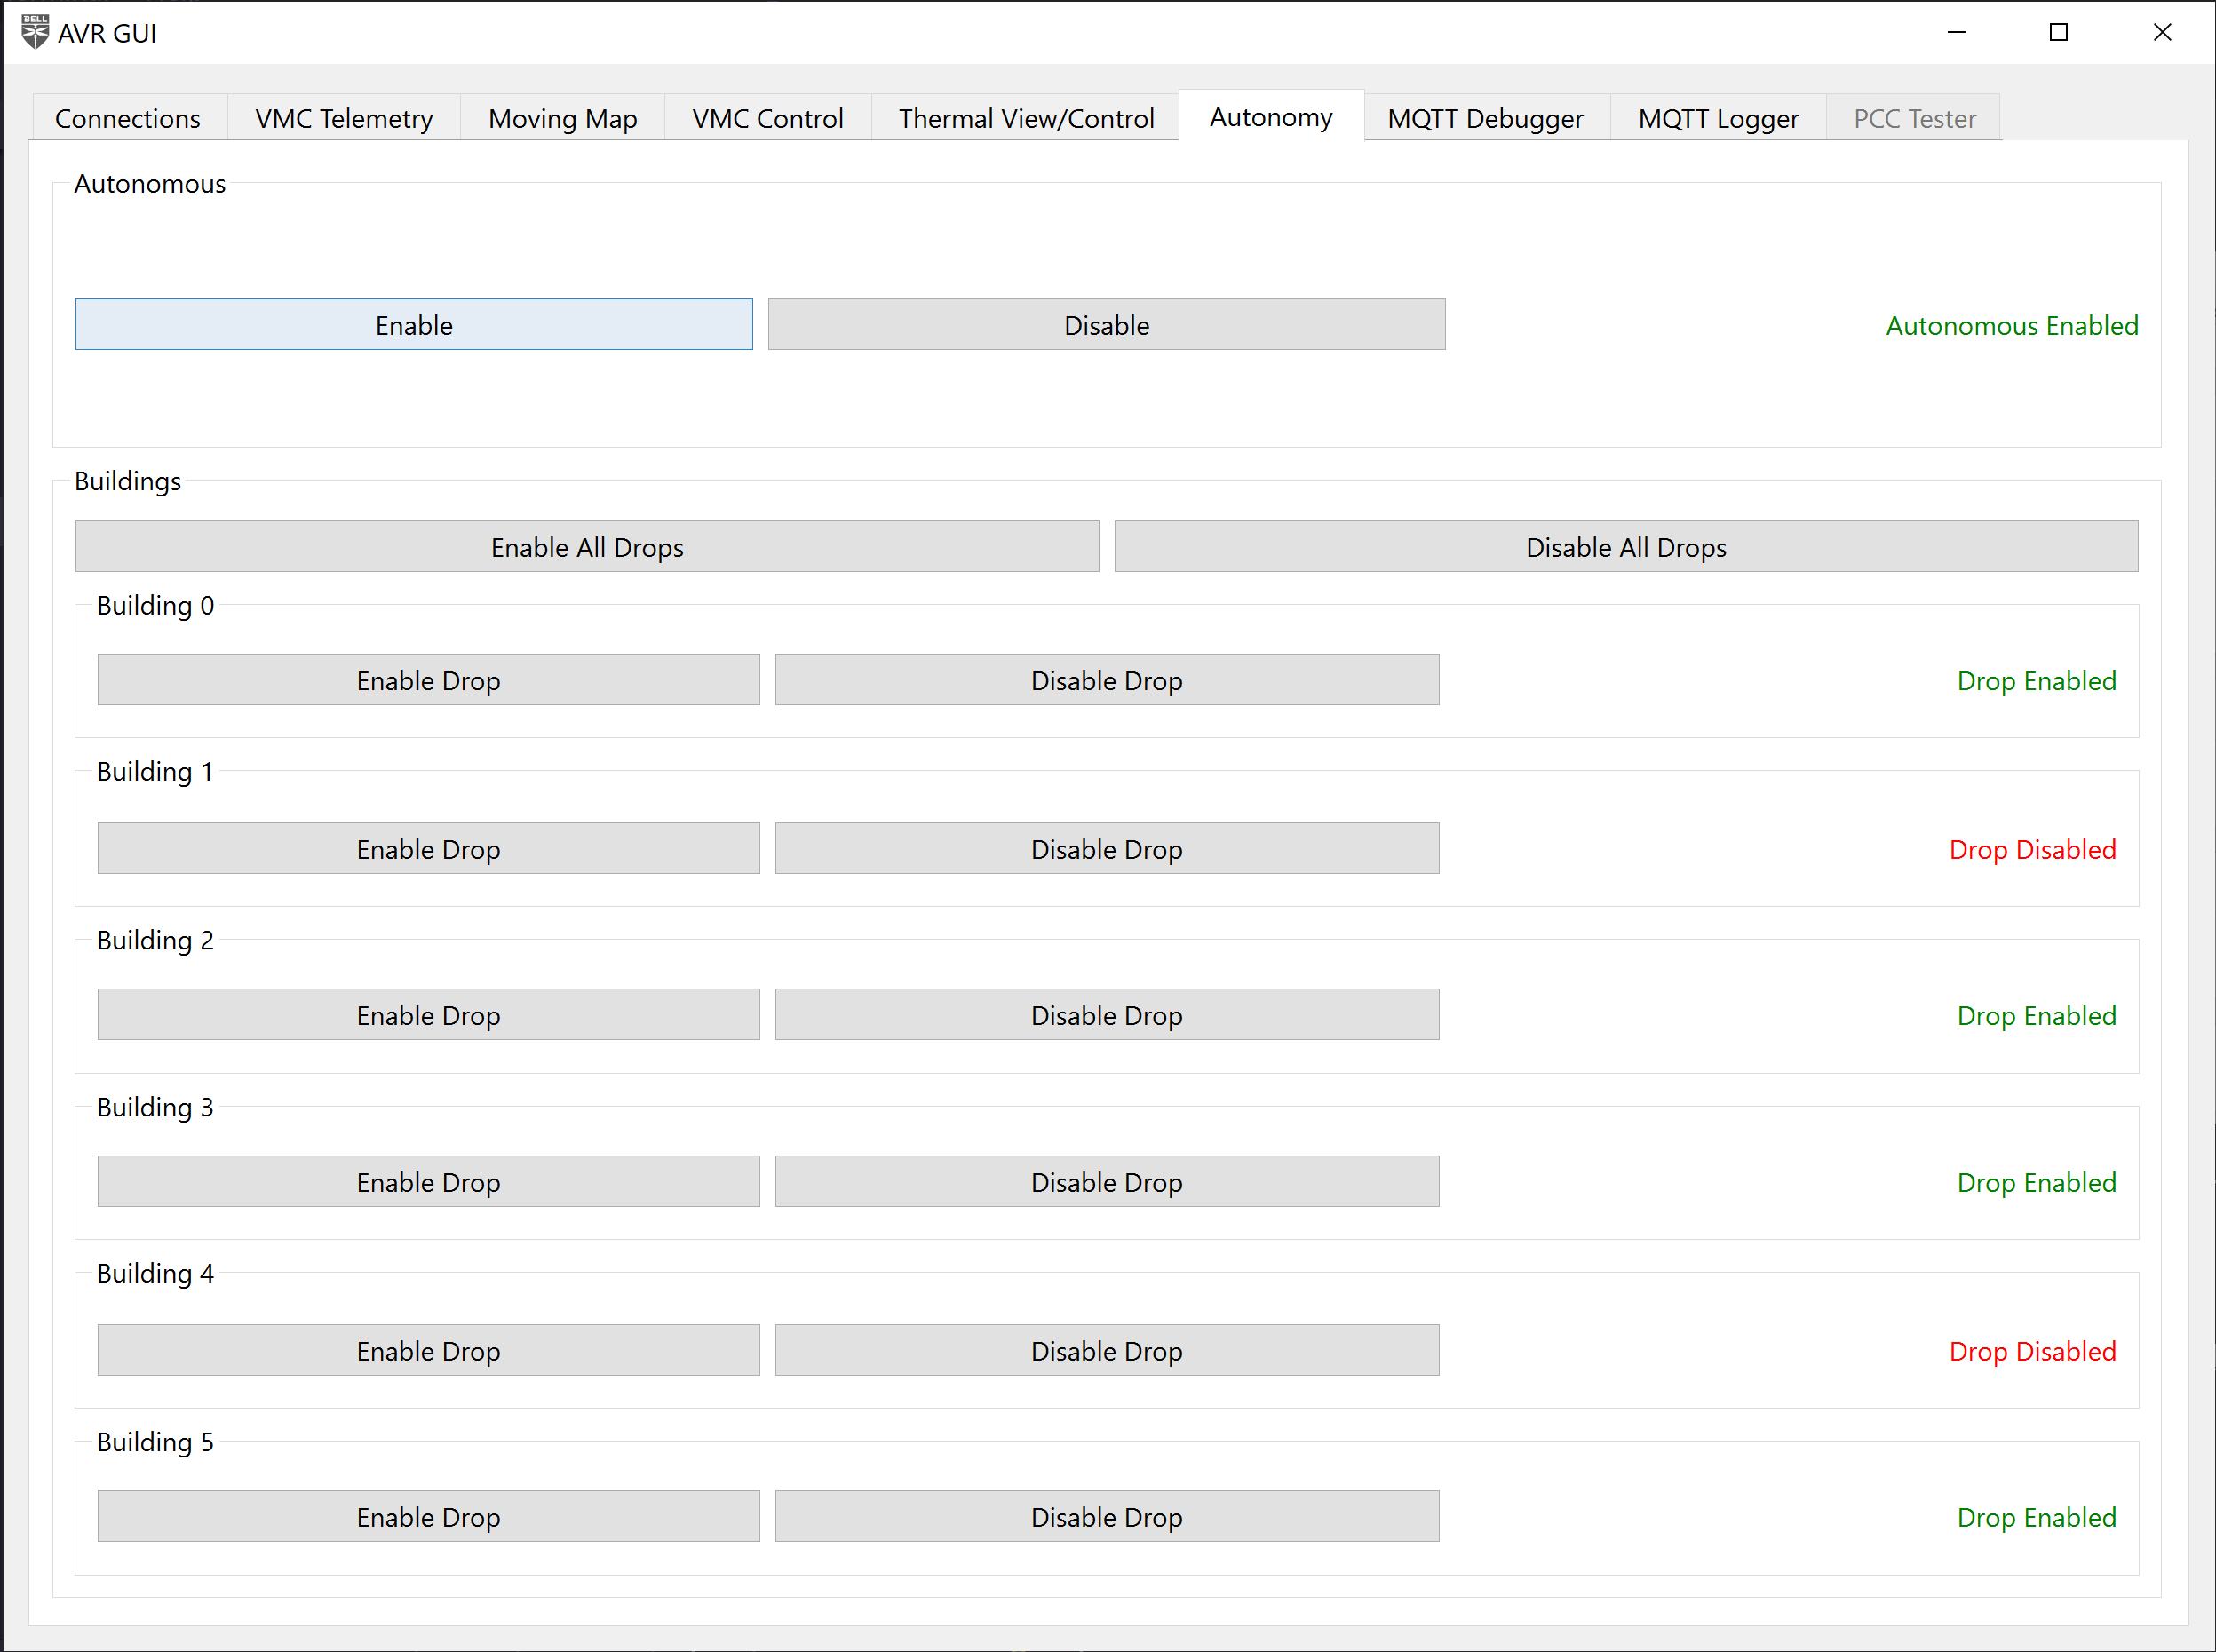
Autonomy Control Tab
Autonomous Enable
The “Autonomous” buttons in the tab,
this is purely optional for the teams that have chosen to write autonomous code.
These buttons send a message to the MQTT topic avr/autonomous with a payload of:
// enable button
{
    "enable": true,
}

// disable button
{
    "enable": false,
}
For any teams writing their own autonomous code, they can write a listener for this topic to enable/disable their autonomous code at certain points, rather than have it run continuously the entire time.
Example implementation:
from bell.avr.mqtt.client import MQTTModule
from bell.avr.mqtt.payloads import AvrAutonomousPayload

class Sandbox(MQTTModule):
    def __init__(self) -> None:
        self.enabled = False
        self.topic_map = {"avr/autonomous": self.on_autonomous_message}

    ...

    def on_autonomous_message(self, payload: AvrAutonomousPayload) -> None:
        self.enabled = payload["enable"]

    def autonomous_code(self) -> None:
        while self.enabled:
            do_stuff()
Building Autonomous Enable Drop
Additionally, buttons for enabling/disabling autonomous water drops are provided on this
page.
These buttons send a message to the MQTT topic avr/autonomous/building/drop with
a payload of:
{
  "id": 0,
  "enabled": true
}
This message can be used to tell you drone what buildings are on fire and if you want to
drop water on it or not. For a full list of which buildings have water drops please
refer to the game manual. The activity of using the avr/autonomous/building/drop
will be implemented by the students in the sadbox module.
[Hint: the above example can also be used in this scenario]
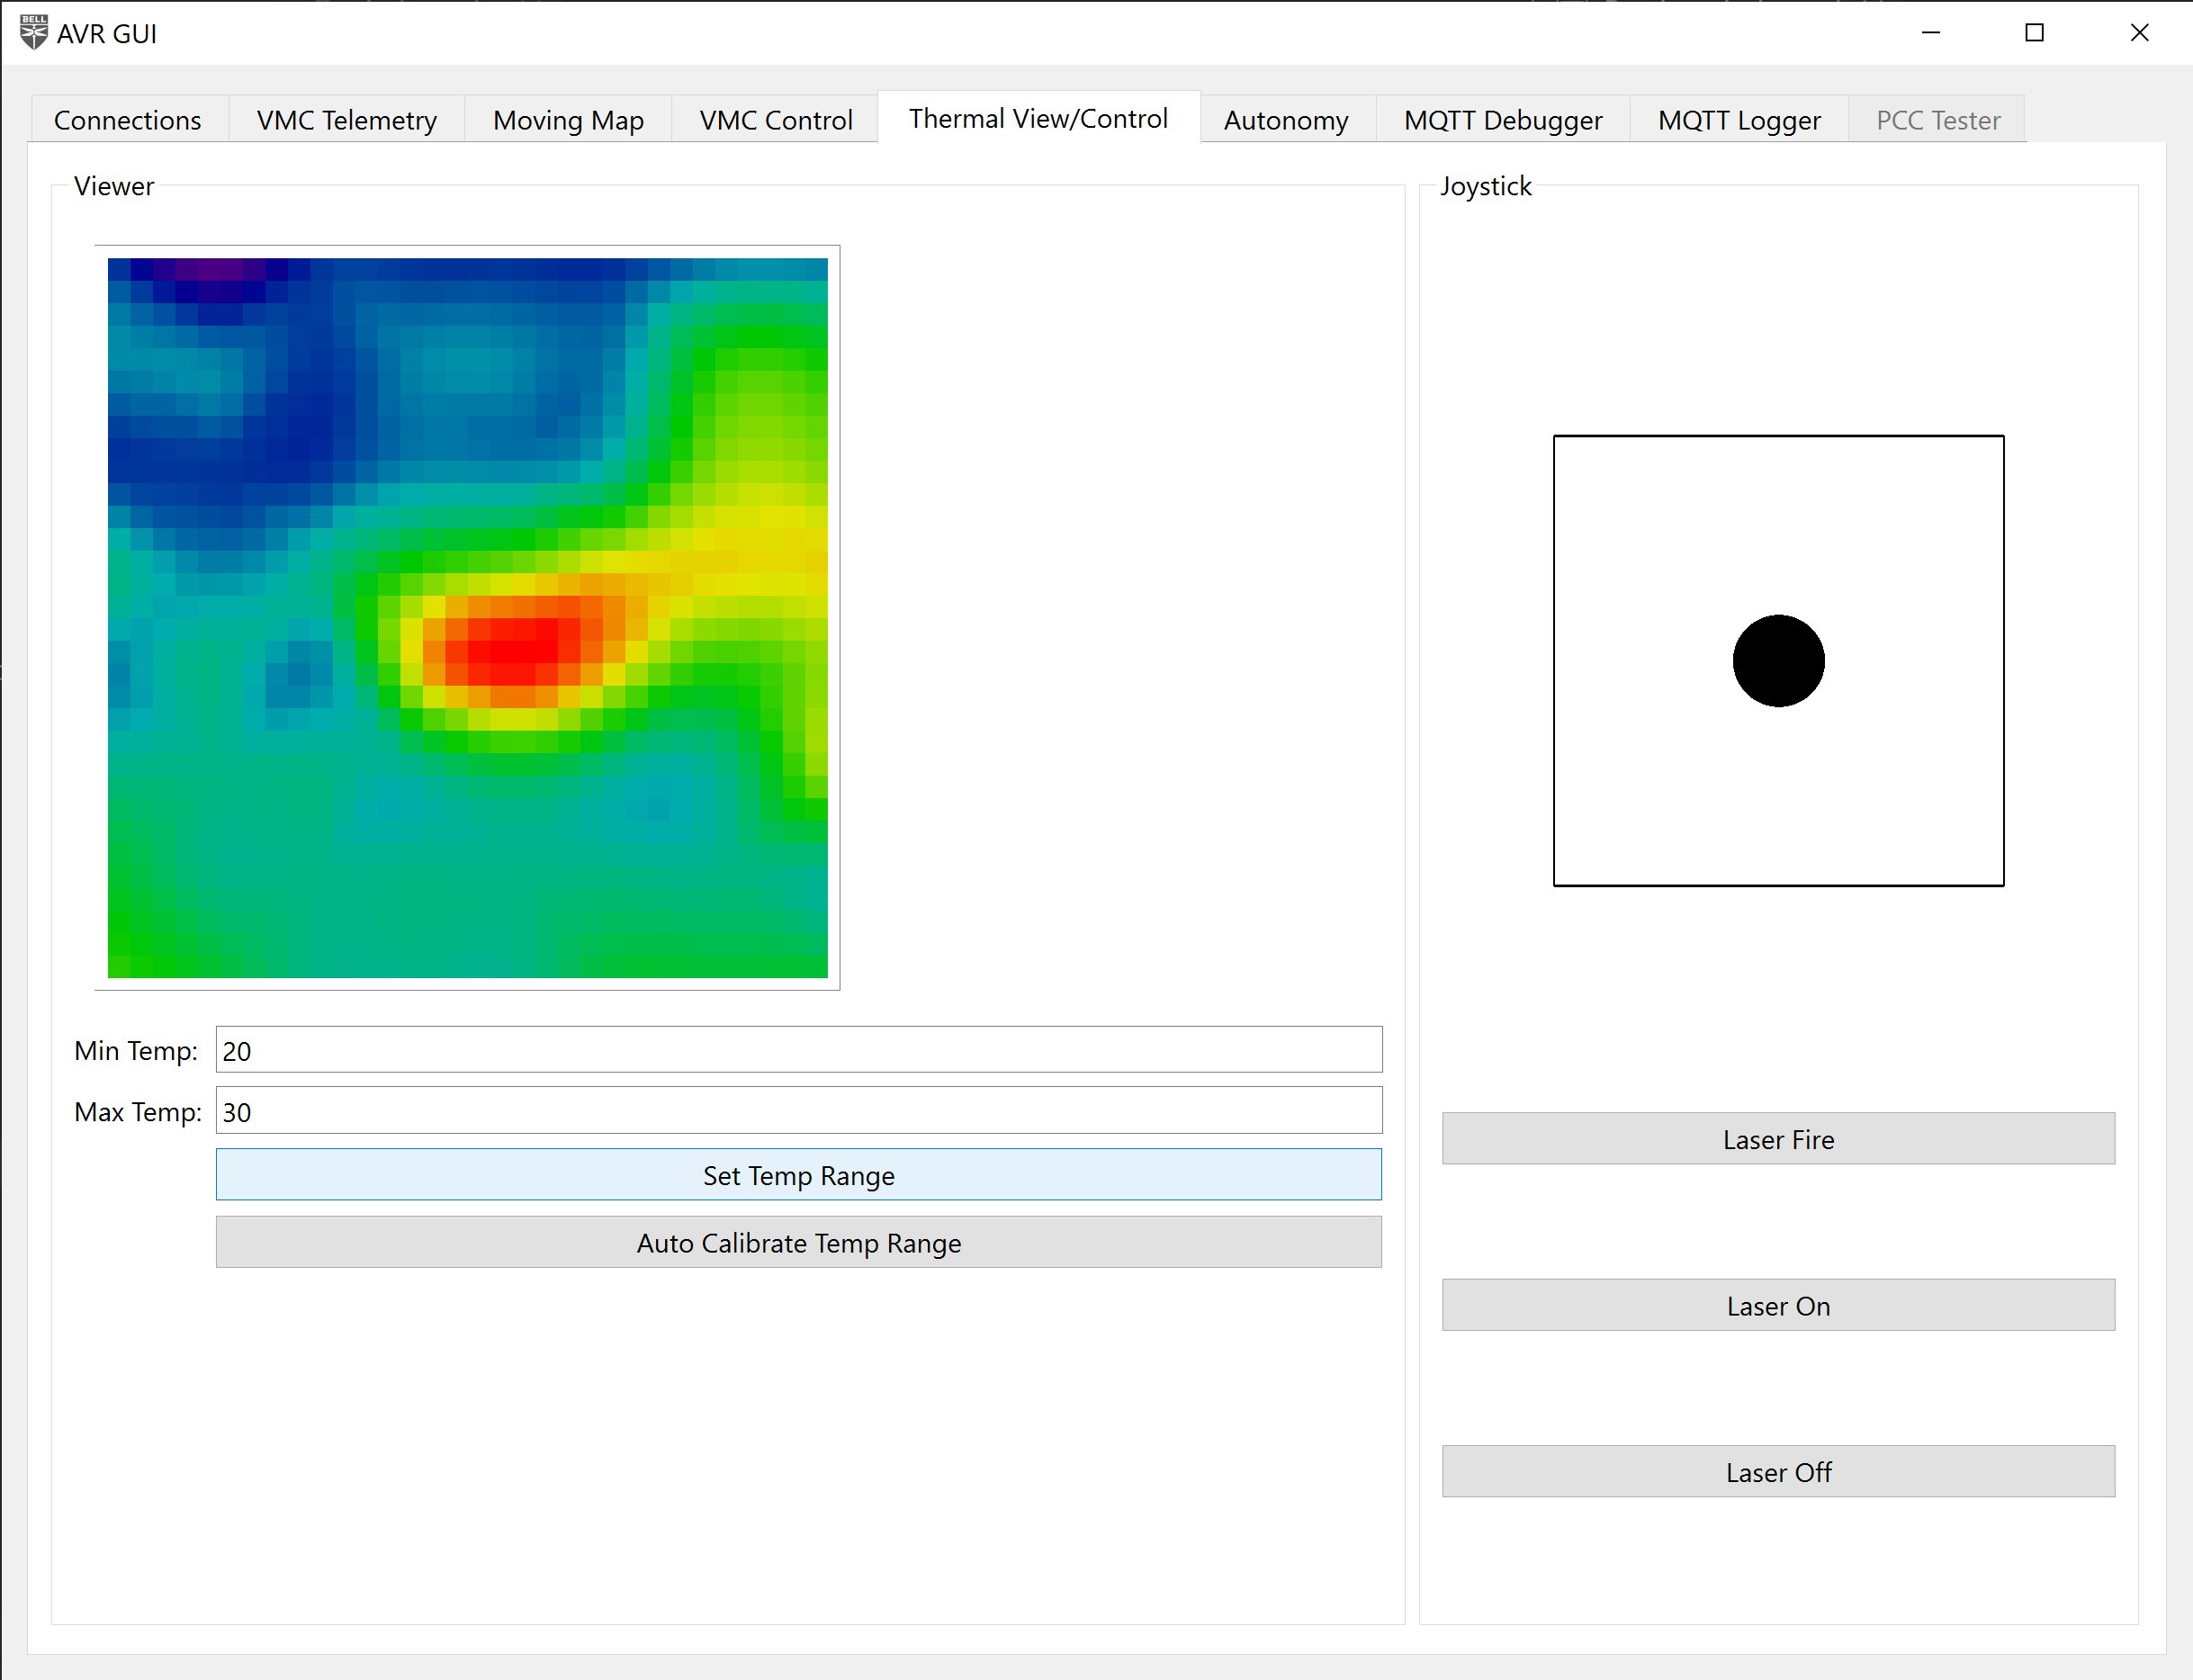
Thermal View/Control
Thermal view and control tab
This tab shows a view of the thermal camera, and provides a means of controlling the gimbal and turning the associated laser on and off.
You can either calibrate your thermal cameras range manual by typing in a min and max value, or you can use the auto calibrate feature to get a dynamic range.
To use the gimbal, click and drag the black dot and move it around within the box. The bounds of the box are the gimbal’s limit.
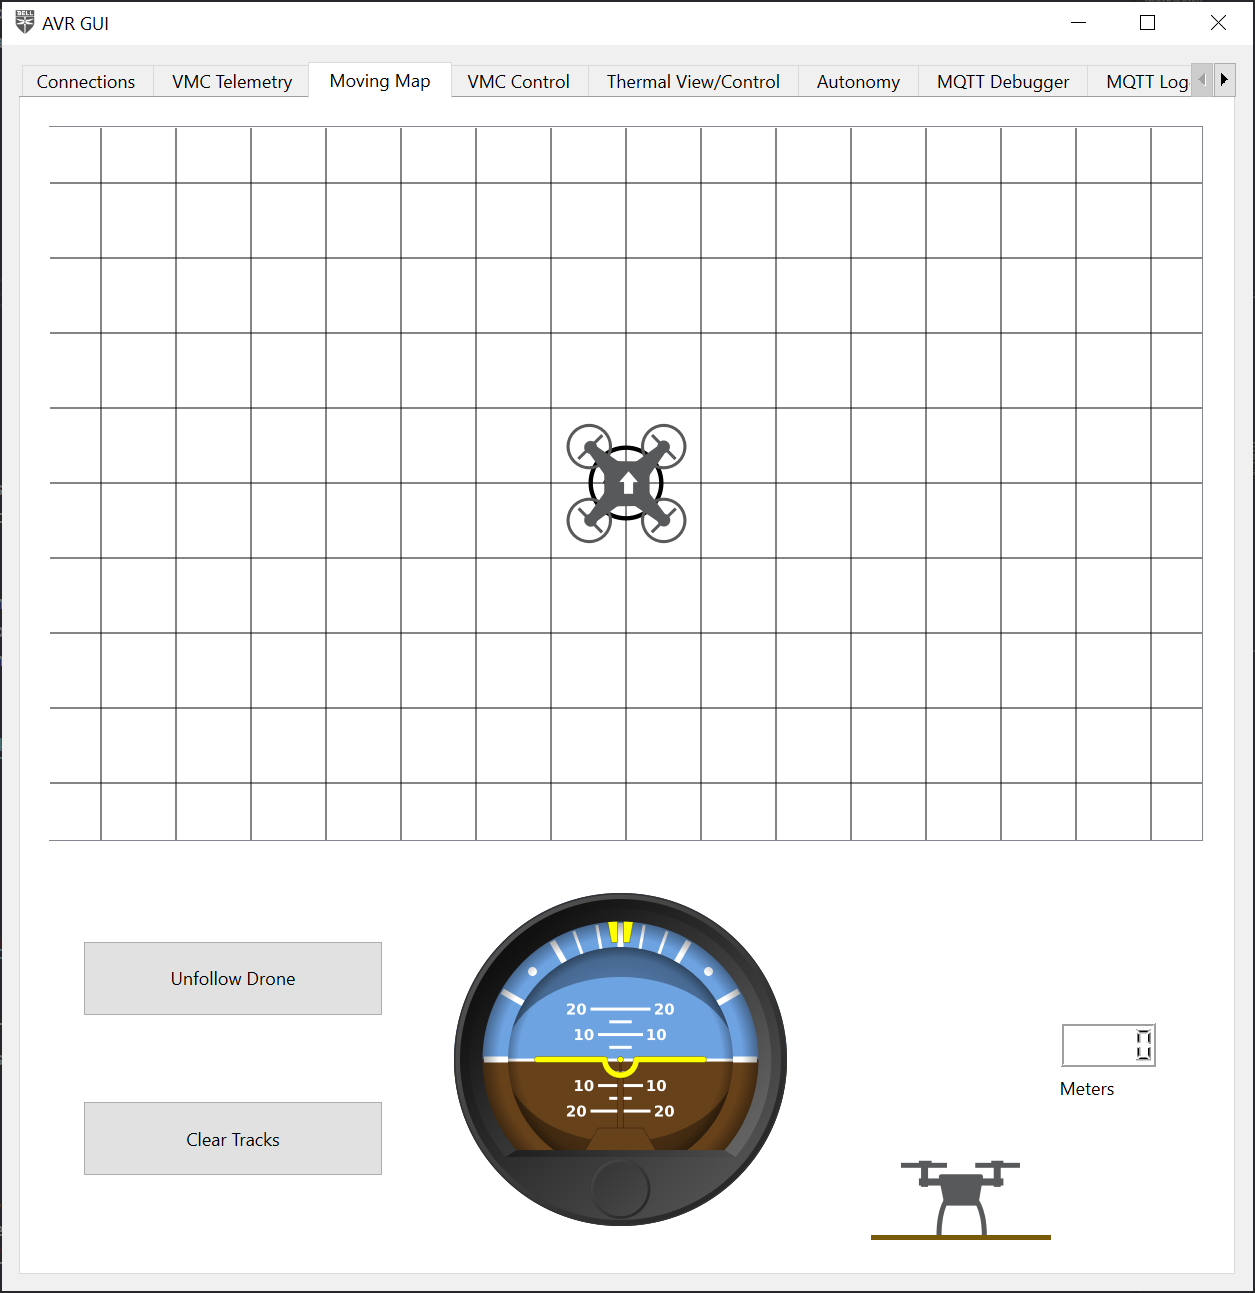
Moving Map
Moving Map Tag
A map of your drones movements has been included for reference while flying. You can use this to reference your location, roll, pitch, yaw, or altitude.
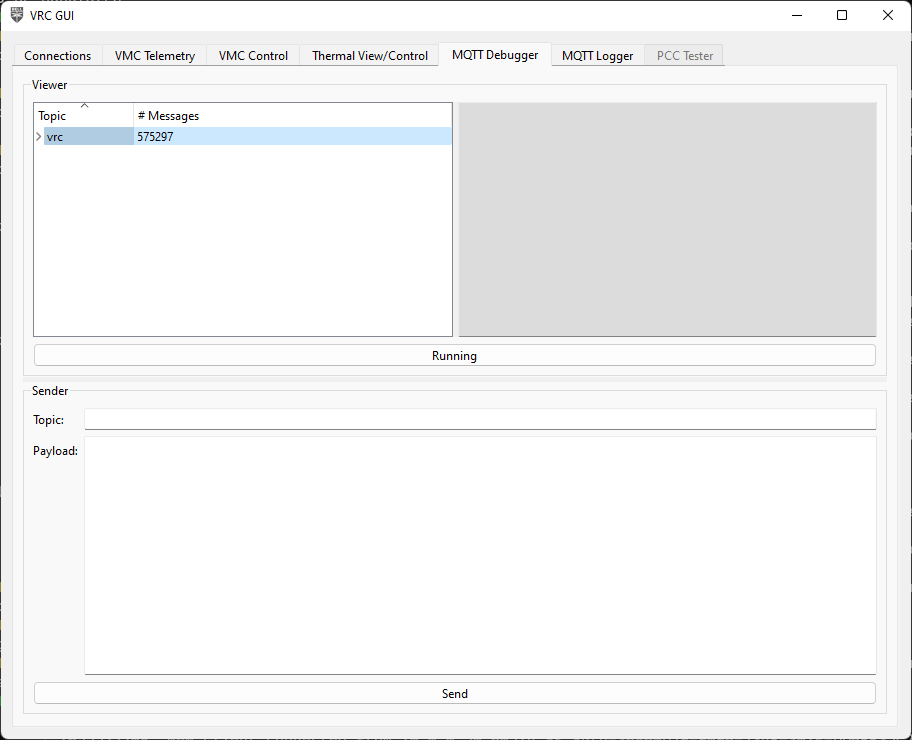
MQTT Debugger
MQTT Debugger Tab
This tab is a debugging tool that shows all MQTT messages that are passing through the AVR software, along with giving you the ability to manually send messages.
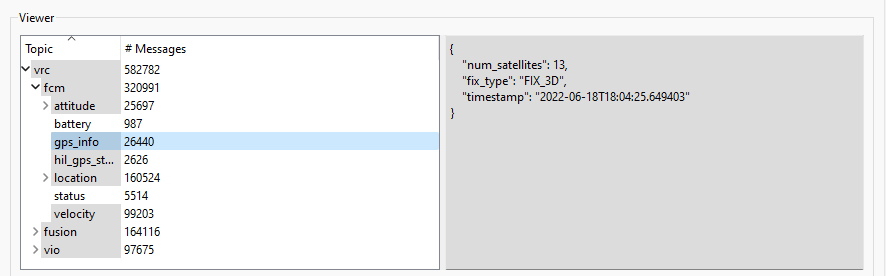
In the top half of the tab is the message viewer. On the left side is a tree view of all the topics with the levels deonting “/“s in the topic name. When you click on a topic, on the right side will show the last payload recieved on that topic, and will update live.
Viewing live data from a topic
To show or hide topics, click the arrow on the left of the trip item to expand or hide the next level, or right-click the topic and select “Expand Children” or “Collapse Children”. To expand or collapse everything, select “Expand All” or “Collapse All”.
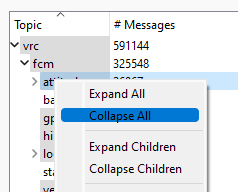
Expanding or collapsing child topics
At the bottom of the viewer is a “Running”/“Paused” button that will cause the viewer to update live, or freeze the current view. This is not associated with the MQTT connection in the Connections tabs. This only stops the viewer from updating when trying to look at data.

Running/paused button
In the bottom half of the tab is the message sender. You can put in the topic you want to send a message to and the payload of the message. Click the “Send” button at the bottom to send the message, and you will see it show up above in the message viewer.
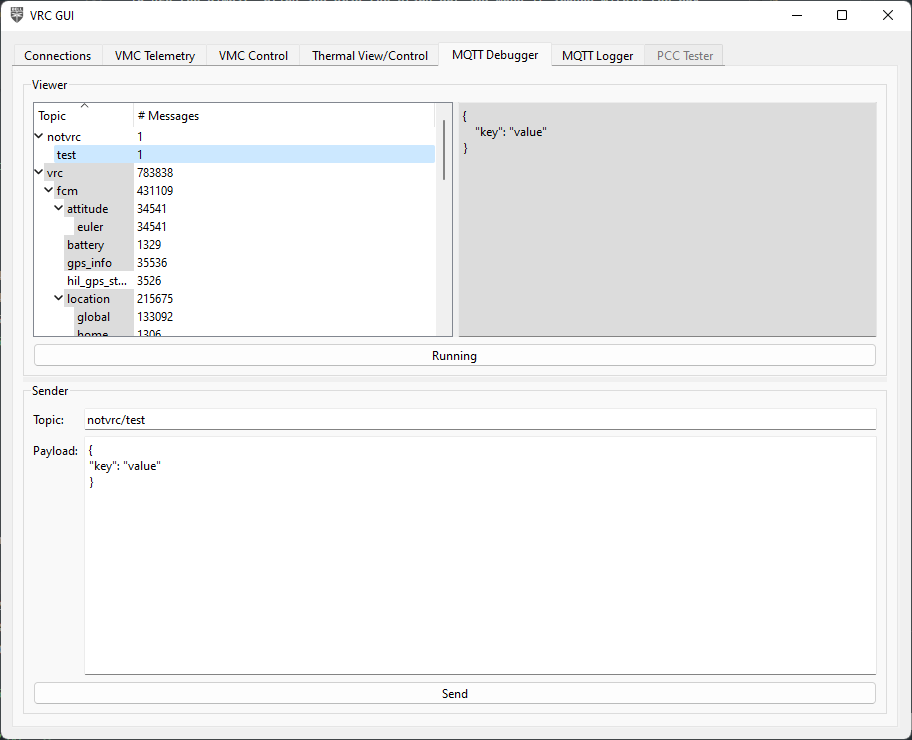
Message sender
Danger
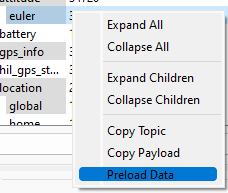
Send MQTT messages at your own risk! This is a debugging tool, and incorrectly formatted messages, or messages with bogus data may cause the flight software to crash, digitially and/or physically.If you want to copy an existing message, right-click on an item in the message viewer and select “Preload data”. This will prefill the topic and payload of the message into the message sender.
Preload data option
Alternatively, you can select “Copy Topic” or “Copy Payload” to copy the topic or payload to your clipboard.
MQTT Logger

MQTT Logger tab
This tab is another debugging tool, that can be used to create a log of MQTT data that can be analyzed at a later time.
Clicking the “Record” button at the bottom
will create a folder called “logs” next to the .exe and create a new
log file with the starting timestamp in the name. The log file is just a .csv file
with 3 columns:
- Timestamp that the message was sent
- Topic of the message
- Payload of the message (JSON data as a string)
Short example:
Timestamp,Topic,Payload
2022-05-15T16:05:21.861220,avr/fcm/location/local,"{""dX"": -2.5455074310302734, ""dY"": -1.5015729665756226, ""dZ"": 2.0492169857025146, ""timestamp"": ""2022-05-15T18:43:51.529153""}"
2022-05-15T16:05:21.865960,avr/fcm/attitude/euler,"{""roll"": 0.3597148656845093, ""pitch"": -1.1968730688095093, ""yaw"": -115.29061126708984, ""timestamp"": ""2022-05-15T18:43:51.533150""}"
2022-05-15T16:05:21.867091,avr/fcm/location/global,"{""lat"": 32.8085261, ""lon"": -97.1563602, ""alt"": -0.1720000058412552, ""hdg"": -6245.665443087664, ""timestamp"": ""2022-05-15T18:43:51.534187""}"
2022-05-15T16:05:21.867533,avr/fcm/velocity,"{""vX"": 0.009999999776482582, ""vY"": 0.0, ""vZ"": -0.009999999776482582, ""timestamp"": ""2022-05-15T18:43:51.535720""}"
2022-05-15T16:05:21.886569,avr/fusion/hil_gps,"{""time_usec"": 1652640231557357, ""fix_type"": 3, ""lat"": 328085260, ""lon"": -971563603, ""alt"": 165206, ""eph"": 20, ""epv"": 5, ""vel"": 0, ""vn"": 0, ""ve"": 0, ""vd"": 0, ""cog"": 24600, ""satellites_visible"": 13, ""heading"": 24638}"
2022-05-15T16:05:21.890844,avr/fcm/location/global,"{""lat"": 32.8085261, ""lon"": -97.1563602, ""alt"": -0.1720000058412552, ""hdg"": -6245.528183606103, ""timestamp"": ""2022-05-15T18:43:51.557302""}"
2022-05-15T16:05:21.891264,avr/fcm/velocity,"{""vX"": 0.009999999776482582, ""vY"": 0.0, ""vZ"": -0.009999999776482582, ""timestamp"": ""2022-05-15T18:43:51.560023""}"
2022-05-15T16:05:21.901353,avr/fcm/location/local,"{""dX"": -2.5456197261810303, ""dY"": -1.5016621351242065, ""dZ"": 2.049142837524414, ""timestamp"": ""2022-05-15T18:43:51.571278""}"
2022-05-15T16:05:21.909915,avr/vio/position/ned,"{""n"": -254.60606976676002, ""e"": -143.7991712686676, ""d"": -370.6543833582757}"
2022-05-15T16:05:21.913765,avr/vio/orientation/eul,"{""psi"": -2.870100228693062, ""theta"": 0.7509557925331154, ""phi"": -1.982899257543946}"
2022-05-15T16:05:21.914391,avr/fusion/position/ned,"{""n"": -254.60606976676002, ""e"": -143.7991712686676, ""d"": -370.6543833582757}"
2022-05-15T16:05:21.914799,avr/vio/heading,"{""degrees"": 246.38824134310744}"
2022-05-15T16:05:21.915277,avr/vio/velocity/ned,"{""n"": 0.006583199572207324, ""e"": -0.020817144593196127, ""d"": 0.02579902535054221}"
2022-05-15T16:05:21.915846,avr/vio/confidence,"{""tracker"": 41}"
To stop recording, click the “Stop recording” button. This will stop writing to the log file.
You can do a lot of things with this data. For example,
you can plot how your drone flew through 3D space using
matplotlib and pandas:
import json

import matplotlib.pyplot as plt
import pandas as pd

# load in the CSV file
df = pd.read_csv("MQTTLog_2022-05-10_17-08-27.csv")
# parse the JSON data into the Pandas dataframe
df = df.join(df["Payload"].apply(json.loads).apply(pd.Series))
# filter to only data from the avr/fcm/location/global topic
px4_data = df[df["Topic"] == "avr/fcm/location/global"]

fig = plt.figure()
ax = plt.axes(projection='3d')

ax.plot3D(px4_data["lat"], px4_data["lon"], px4_data["alt"], label="PX4")

ax.set_xlabel("Latitude")
ax.set_xlabel("Longitude")
ax.set_zlabel("Altitude")

plt.legend()
plt.show()
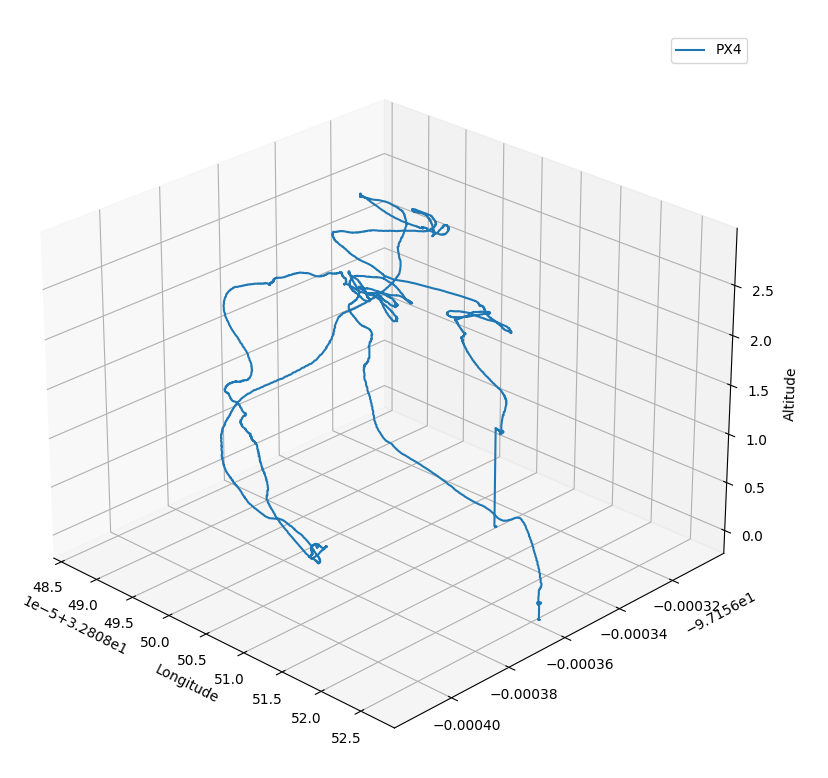
Using matplotlib to plot a drone’s flight
Another example is plotting the drone’s battery remaining over time:
import csv
import datetime
import json

import matplotlib.pyplot as plt

filename = "MQTTLog_2022-05-15_16-05-21.csv"

x = []
y = []

with open(filename, "r") as fp:
    # create a DictReader to read the CSV file
    reader = csv.DictReader(fp)
    for row in reader:
        # only get data from the avr/fcm/battery topic
        if row["Topic"] == "avr/fcm/battery":
            # parse the JSON data
            payload = json.loads(row["Message"])

            # convert the timestamp to a Python datetime object
            x.append(datetime.datetime.fromisoformat(row["Timestamp"]))
            y.append(payload["soc"])

fig = plt.figure()

plt.plot(x, y)

plt.xlabel("Time")
plt.ylabel("Battery %")

plt.ylim(0, 105)
plt.grid(True)

plt.show()
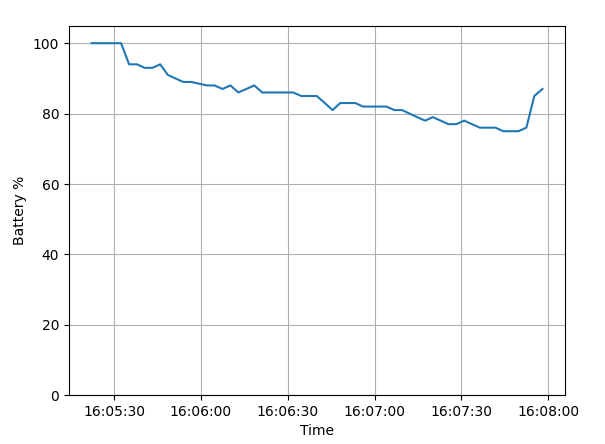
Using matplotlib to plot battery percentage
PCC Tester
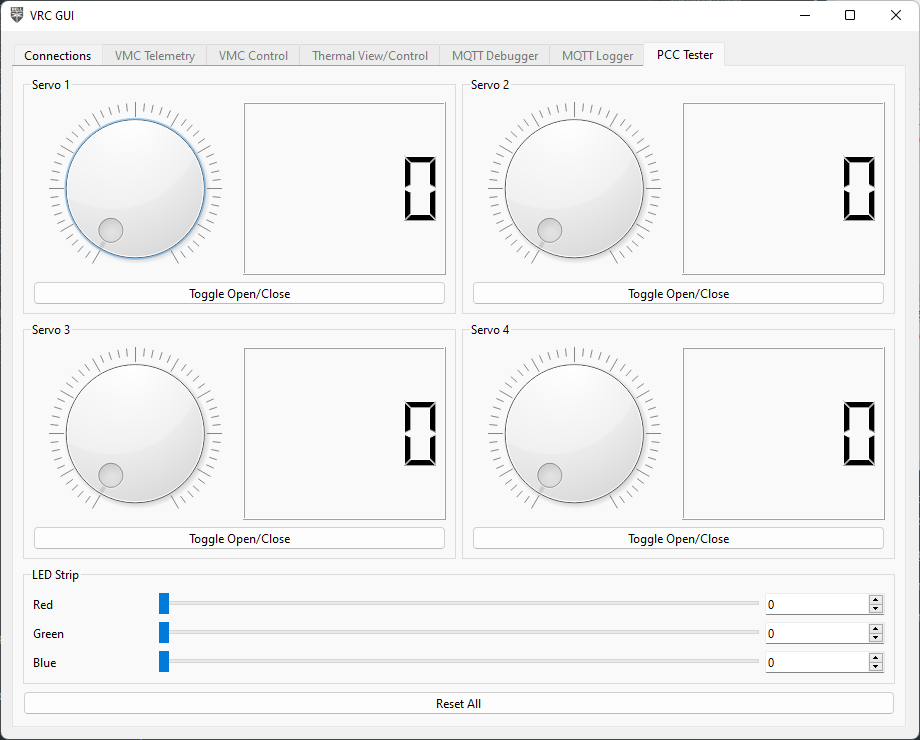
PCC Tester tab
This is covered when testing the PCC